Explore My Deco X50 Firmware
So I got this TP-Link router from my ISP with my new FTTH subscription that had been made available in my neighborhood since last year. The equipments include this Deco X50 with a custom firmware and a standard off-the-shelf Nokia XGS-PON modem. After some exchange over the phone with their support for new install, I realized the router could be entirely configured and remotely controlled from their system which I think is such a good thing for most people since not everyone is going to enjoy poking around those settings. In fact, if you have to exchange your router for some reason, they could even preload it your PPPoE credentials, thus making the process just plug-and-play when it arrives. Okay, that is good and all but I want to see how this factory provisioning actually works. Let’s dump it entire flash.
Contents
Get It Open
The router is compact and like many consummer devices nowaday, there is literally no screw, even under the label on the bottom. Since I didn’t want to break it, after looking up some video online, I found this person showing it on YouTube and proceed to follow. After some struggle I got it open and end up leaving some dents on the top edge of the housing.
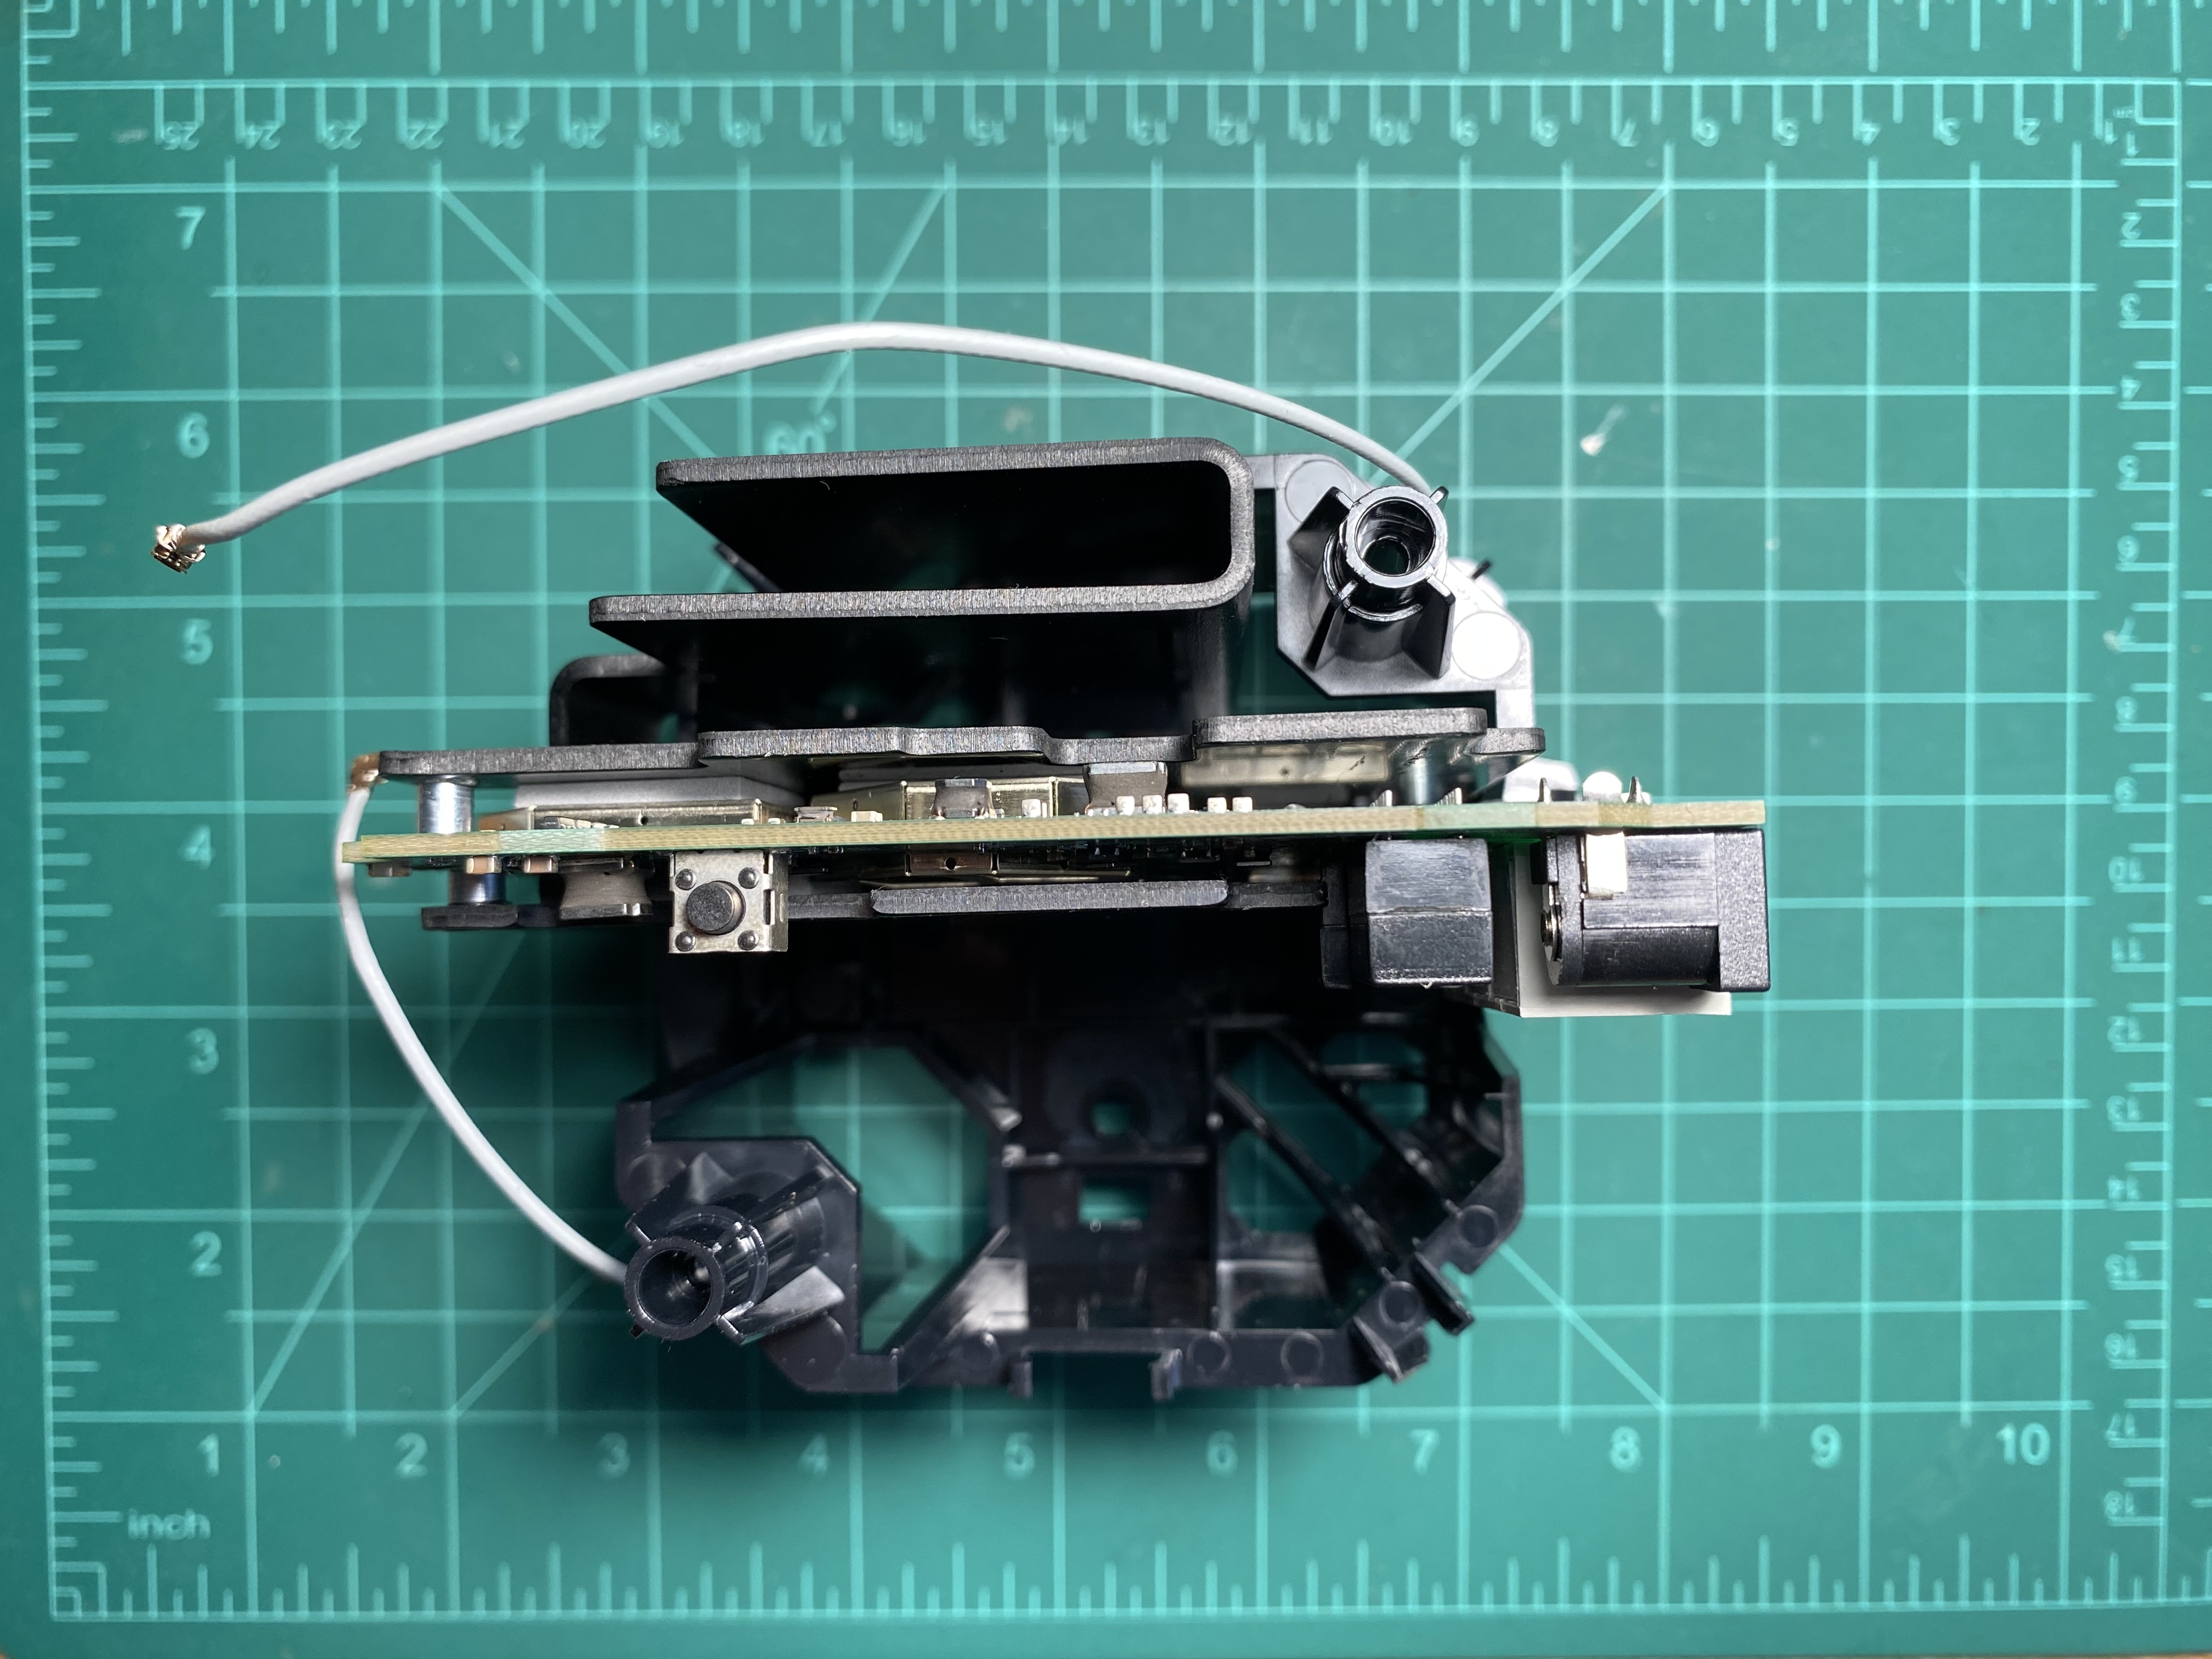
Just a few more screws from the heatsinks on both side and the PCB is out.
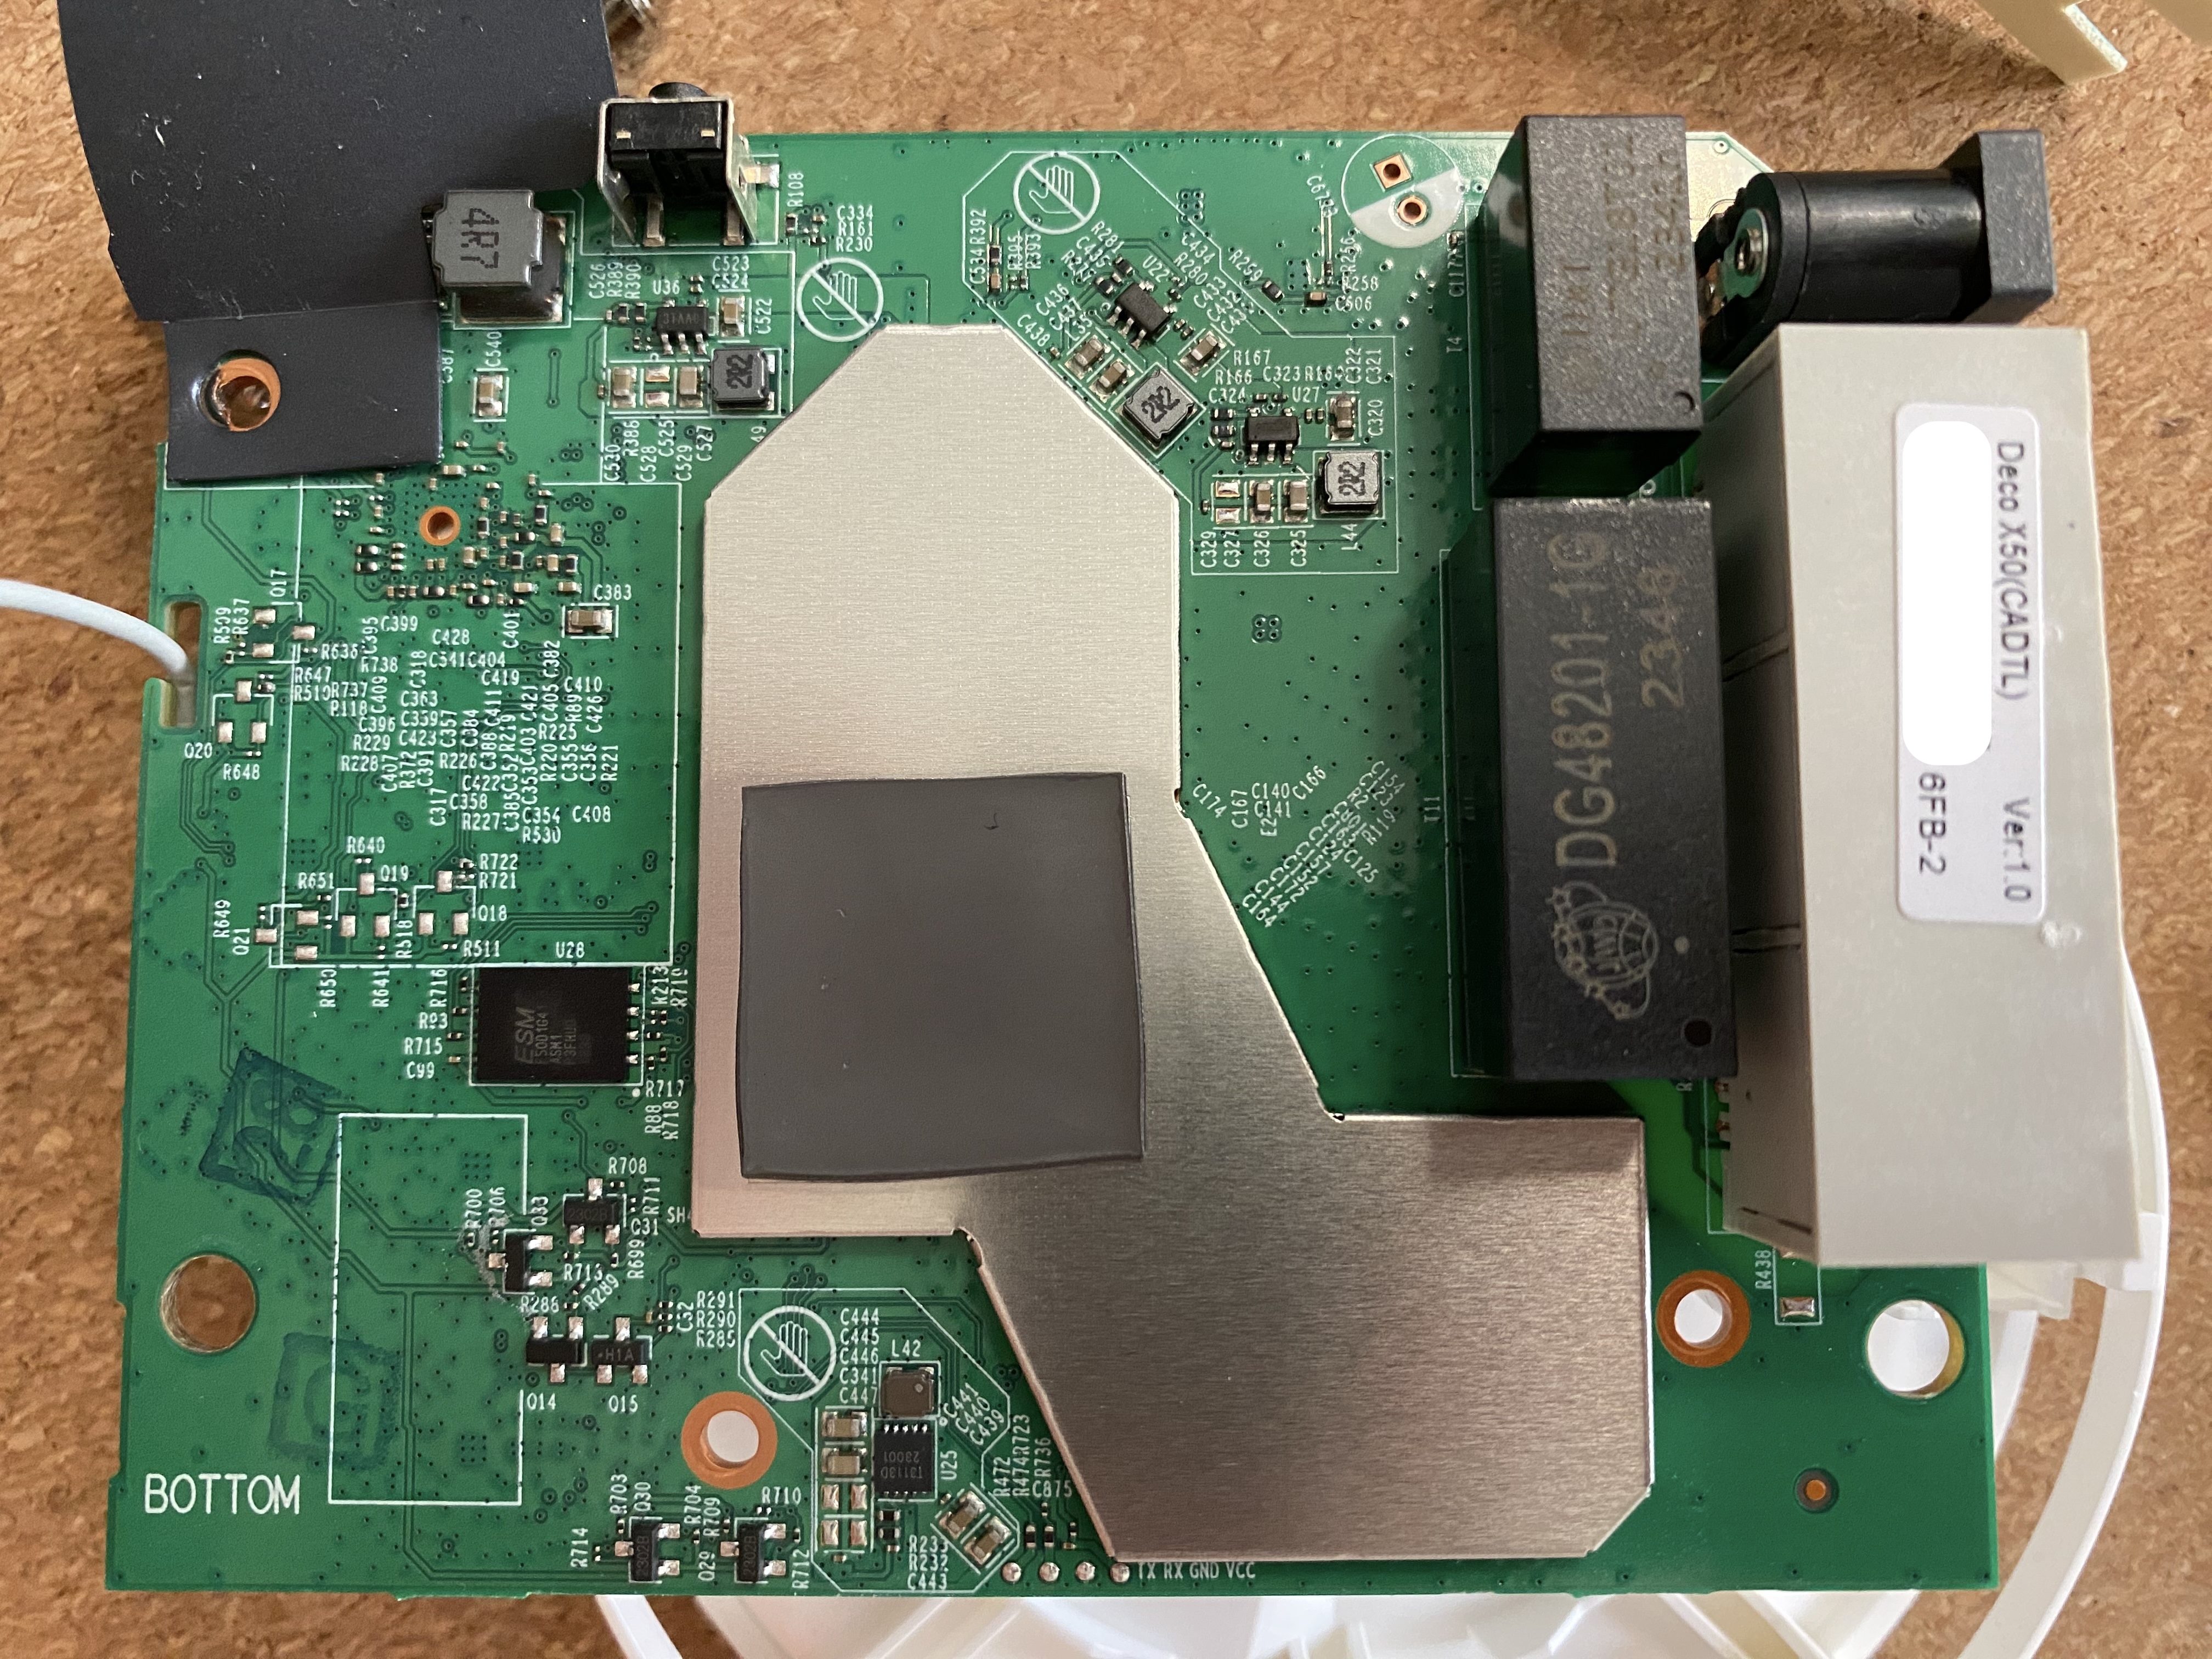
Upon a close inspection, there are 4 pins (near the bottom edge) clearly labeled by the manufacturer, how nice of them! Checking the voltage with a multimeter reveals that it is running at 1.8V. Alright, time to capture my the boot log.
Capture Boot Log
I got my trusted soldering iron out to hook up some wires to the pads on the pcb, connect them to my serial adapter over a logic level shifter just to be safe. Turning it on, I have my serial adapter running with tio to capture its boot log.
Here is the router specs
- ARM64 Architecture
- Qualcomm IPQ5018 CPU
- 512 MiB RAM
- 128 MiB 1.8V ESMT F50D1G41LB NAND Flash
Also important to save this flash address table for later on
[    1.024163] Creating 16 MTD partitions on "qcom_nand.0":
[    1.030366] 0x000000000000-0x000000080000 : "SBL1"
[    1.037188] 0x000000080000-0x000000100000 : "MIBIB"
[    1.042117] 0x000000100000-0x000000140000 : "BOOTCONFIG"
[    1.056959] 0x000000140000-0x000000180000 : "BOOTCONFIG1"
[    1.068291] 0x000000180000-0x000000280000 : "QSEE"
[    1.080176] 0x000000280000-0x0000002c0000 : "DEVCFG"
[    1.091481] 0x0000002c0000-0x000000300000 : "CDT"
[    1.102745] 0x000000300000-0x000000380000 : "APPSBLENV"
[    1.114267] 0x000000380000-0x0000004c0000 : "APPSBL"
[    1.126468] 0x0000004c0000-0x0000005c0000 : "ART"
[    1.138435] 0x0000005c0000-0x000000640000 : "TRAINING"
[    1.149965] 0x000000640000-0x000003040000 : "rootfs"
[    1.194630] mtd: device 11 (rootfs) set to be root filesystem
[    1.194896] mtdsplit: no squashfs found in "rootfs"
[    1.199413] 0x000003040000-0x000005a40000 : "rootfs_1"
[    1.249128] 0x000005a40000-0x000005ac0000 : "ETHPHYFW"
[    1.260655] 0x000005ac0000-0x0000063c0000 : "factory_data"
[    1.279123] 0x0000063c0000-0x0000074c0000 : "runtime_data"
Get A Console
After the router fully boots up with Linux, it doesn’t respond to any keypress sent from my serial console, so it seems like that is it for linux on this thing. Checking out the boot log, I noticed this line before it boot Linux
Enter magic string to stop autoboot in 1 seconds
It looks like we could interupt the booting process by sending some ‘magic’ text, so let’s do googling. It turns out that these TP-Link devices want to see the string tpl to let us in their u-boot shell. After spending some time poking around the shell, I noticed a few useful things.
Here is the list of available commands
IPQ5018# help
?       - alias for 'help'
ar8xxx_dump- Dump ar8xxx registers
base    - print or set address offset
bdinfo  - print Board Info structure
bootelf - Boot from an ELF image in memory
bootipq - bootipq from flash device
bootm   - boot application image from memory
bootp   - boot image via network using BOOTP/TFTP protocol
bootvx  - Boot vxWorks from an ELF image
bootz   - boot Linux zImage image from memory
canary  - test stack canary
chpart  - change active partition
cmp     - memory compare
coninfo - print console devices and information
cp      - memory copy
crc32   - checksum calculation
dhcp    - boot image via network using DHCP/TFTP protocol
dm      - Driver model low level access
echo    - echo args to console
editenv - edit environment variable
env     - environment handling commands
erase   - erase FLASH memory
exectzt - execute TZT

exit    - exit script
false   - do nothing, unsuccessfully
fdt     - flattened device tree utility commands
flash   - flash part_name
flash part_name load_addr file_size

flasherase- flerase part_name

flinfo  - print FLASH memory information
fuseipq - fuse QFPROM registers from memory

go      - start application at address 'addr'
help    - print command description/usage
httpd   - Start httpd server
i2c     - I2C sub-system
imxtract- extract a part of a multi-image
ipq5018_mdio- IPQ5018 mdio utility commands
ipq_mdio- IPQ mdio utility commands
is_sec_boot_enabled- check secure boot fuse is enabled or not

itest   - return true/false on integer compare
loop    - infinite loop on address range
md      - memory display
mii     - MII utility commands
mm      - memory modify (auto-incrementing address)
mmc     - MMC sub system
mmcinfo - display MMC info
mtdparts- define flash/nand partitions
mtest   - simple RAM read/write test
mw      - memory write (fill)
nand    - NAND sub-system
nboot   - boot from NAND device
nfs     - boot image via network using NFS protocol
nm      - memory modify (constant address)
part    - disk partition related commands
pci     - list and access PCI Configuration Space
ping    - send ICMP ECHO_REQUEST to network host
printenv- print environment variables
protect - enable or disable FLASH write protection
reset   - Perform RESET of the CPU
run     - run commands in an environment variable
runmulticore- Enable and schedule secondary cores
saveenv - save environment variables to persistent storage
secure_authenticate- authenticate the signed image

setenv  - set environment variables
setexpr - set environment variable as the result of eval expression
sf      - SPI flash sub-system
showvar - print local hushshell variables
sleep   - delay execution for some time
smeminfo- print SMEM FLASH information
source  - run script from memory
test    - minimal test like /bin/sh
test_mode- set test mode
tftpboot- boot image via network using TFTP protocol
tftpput - TFTP put command, for uploading files to a server
true    - do nothing, successfully
tzt     - load and run tzt

uart    - UART sub-system
ubi     - ubi commands
ubifsload- load file from an UBIFS filesystem
ubifsls - list files in a directory
ubifsmount- mount UBIFS volume
ubifsumount- unmount UBIFS volume
version - print monitor, compiler and linker version
zip     - zip a memory region
Among those, the nand command could be used to dump the entire flash by either loading each partition into memory then print memory content to serial console or printing the data and even OOB for each page of chip directly which could be used for cases where RAM is limited.
IPQ5018# nand dump 0x0
Page 00000000 dump:
22 0c dd f3 00 00 05 58  b6 08 00 5c 00 df ff ff
80 00 00 00 00 00 ff ff  b2 00 00 00 00 14 a3 15
b2 00 00 00 00 14 a3 15  b2 00 00 00 00 14 a3 15
...
3f 2f 72 1b 00 00 00 00  00 00 00 00 00 00 00 00
00 00 00 00 00 00 00 00  00 00 00 00 00 00 00 00
00 00 00 00 00 00 00 00  00 00 00 00 00 00 00 00
00 00 00 00 00 00 00 00  00 00 00 00 00 00 00 00
OOB:
af 66 7f fc 2d 32 ee 47
ae a6 aa 74 ef 51 2e 09
ed 93 9a c2 97 79 e5 24
b5 ef 51 2e 09 ed 93 9a
c2 97 79 e5 24 b5 ef 51
2e 09 ed 93 9a c2 97 79
e5 24 b5 ef 51 2e 09 ed
93 9a c2 97 79 e5 24 b5
With that, we should have no problem dumping the flash without pulling the chip off the board. However, that was what I believe I would have done if knew it at the time; I proceeded to lift the chip.
Dump The Flash
From the boot log we got the chip model, the Linux driver being used, and details such as page size, spare (Out-Of-Band) size and ECC capability
NAND: QPIC controller support serial NAND
ID = 7f7f11c8
Vendor = c8
Device = 11
Serial Nand Device Found With ID : 0xc8 0x11
Serial NAND device Manufacturer:F50D1G41LB(2M)
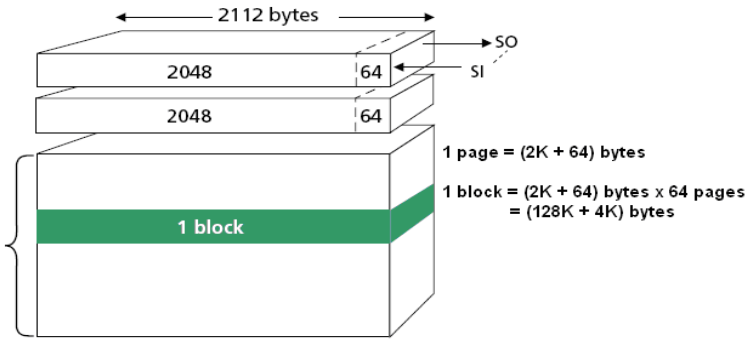
Device Size:128 MiB, Page size:2048, Spare Size:64, ECC:4-bit
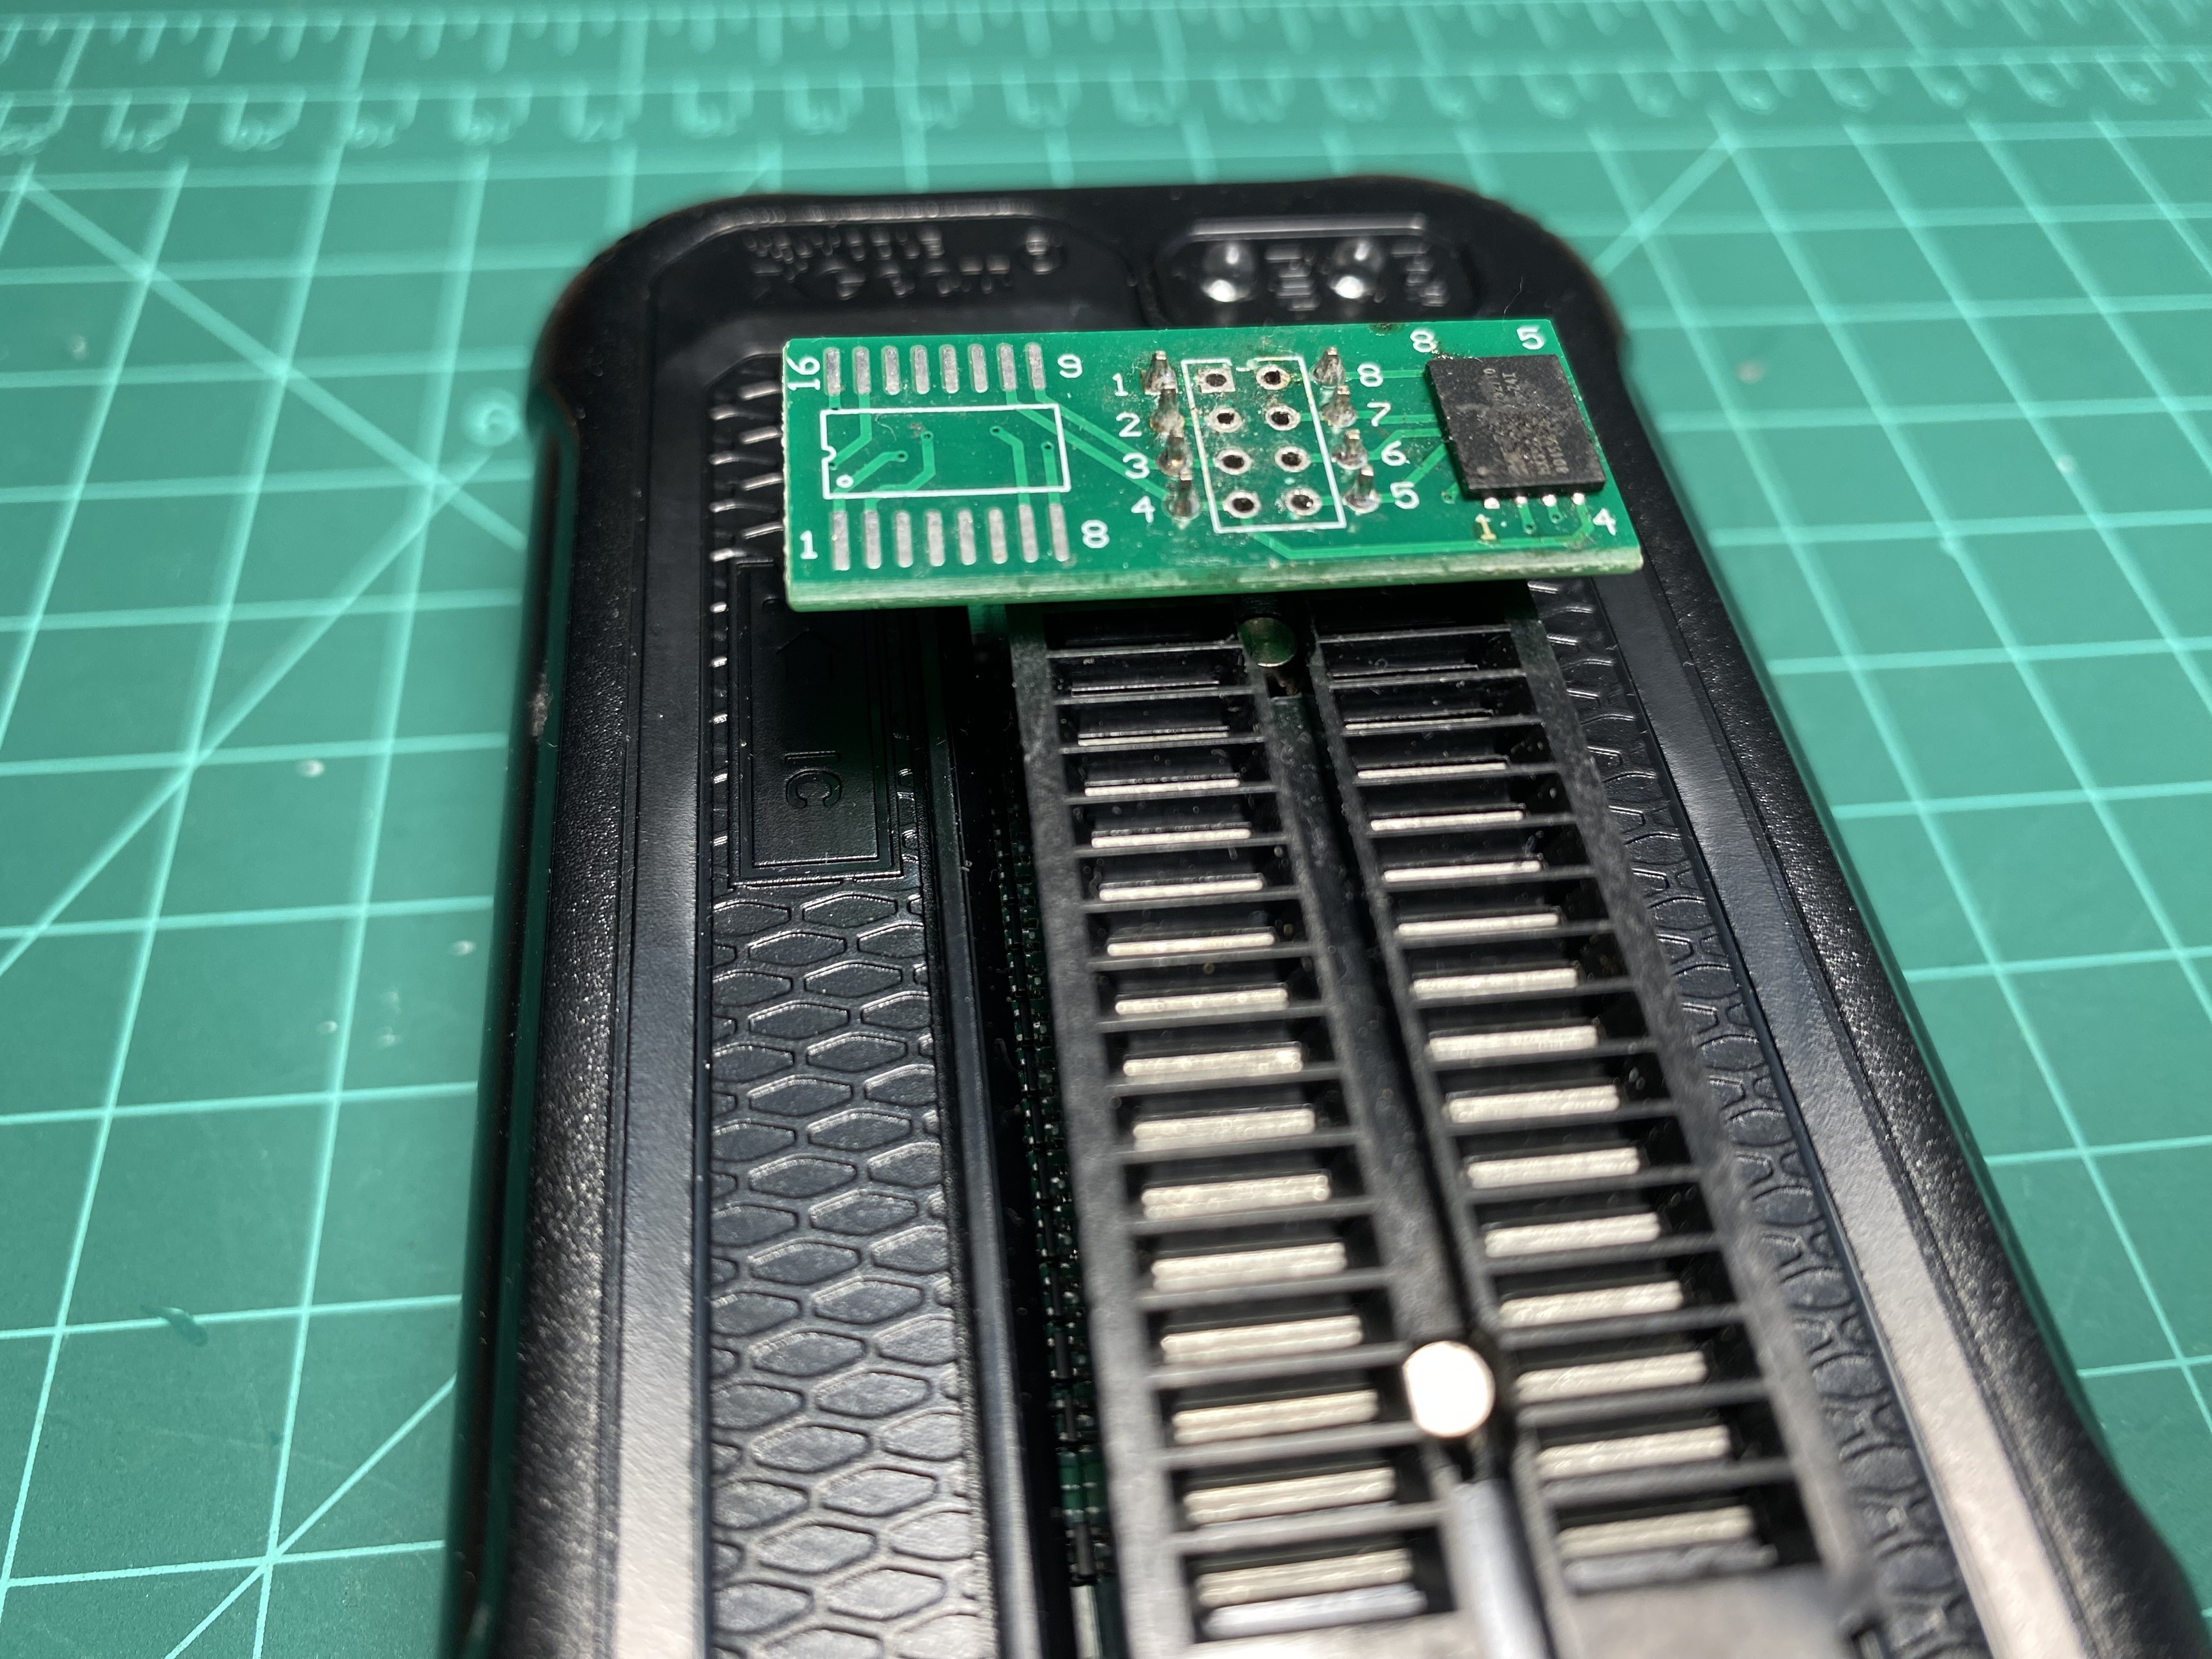
The flash chip uses WSON8 packaging which unlike SOP8 features a large solder pad on the bottom to help with heat disspipation. This in turn also making our job hard and riskier to do with just a heat gun. It is due to the fact we need to make that big area connected the ground plane of the whole pcb melt, but pumping too much heat onto some component for too long can cause problems. However, I got to work with what I have. I proceeded to heat up the chip with flux and also the back of board where it is sitting on. After some time, I lifted the chip and solder it onto a breakout board to use with my XGecu T48 read its content. With the prorietary XGPro software I had running on my only windows machine layout around, I had to dial down the speed and reading it was successfull. It is now time to unpack it
Unpack The Dump
Looking up the datasheet for this chip model, I have the page layout being 1024 bytes of data followed by 64 bytes of spare, exactly what we saw from the boot log. Running the binary dump directly through binwalk give a long list of XZ compressed data and UBI image at addresses that seem random and with some experience looking at binary, one could easily tell these are just false positives. After some research because I didn’t know much at the time, new devices like what I have here uses NAND typed flash chip which give large storage capacity at low cost with a tradeoff being that each block, a smallest unit of erase/write, can wear out after certain number of write cycles. To combat this, manufacturer gives product developers an tiny extra amount of space on each page to store this extra data called Out-Of-Band data that is used to correct the actual data (up to a certain number of error - ECC capability)
Since what we have now is a full flash dump with both actual data (could contains errors) and OOB data, we need a way to make use of OOB and extract correct data from the dump. Although in the chip datasheet, the manufacturer shows a layout of where and how long data and OOB is, it is just a mere suggestion. Indeed, when we have a look the binary dump in a hex editor, we can confirm that the device vendor or to be exact the processor vendor in this case Qualcomm uses a custom layout for their flash under QPIC NAND controller (from boot log) which also is well documented in the Linux kernel

So for each page, the first three codewords (term for the smallest unit that contains both actual data and ECC parity data) are the same, but the last one is different. Details on the process I use to spot the boundaries and figure out the layout could be found in my other repo. Judging from the length of the ECC parity data (7 bytes long), we can tell that it uses 4-bit BCH algorithm for error correction which matches the ECC capability/strength we found from the boot log.
With that in mind, I wrote some python scripts to loop through each codeword - pair of data + OOB (the flash dump is just a bunch of pages back to back and in this case each page has 4 codewords) correct the error, and remove OOBs, leaving us with just data that is binwalkable. Or is it?
10240                              0x2800                             ELF binary, 32-bit executable, ARM for System-V (Unix), little endian
1572864                            0x180000                           ELF binary, 64-bit executable, ARM 64-bit for System-V (Unix), little endian
2621440                            0x280000                           ELF binary, 64-bit executable, ARM 64-bit for System-V (Unix), little endian
3670016                            0x380000                           ELF binary, 32-bit shared object, ARM for System-V (Unix), little endian
4109932                            0x3EB66C                           CRC32 polynomial table, little endian
4110956                            0x3EBA6C                           CRC32 polynomial table, little endian
4227024                            0x407FD0                           gzip compressed data, original file name: "dtb_combined.bin", operating system: Unix, timestamp: 2022-02-24 09:53:51, total size: 5328 bytes
6553600                            0x640000                           UBI image, version: 1, image size: 67371008 bytes
73924608                           0x4680000                          UBI image, version: 1, image size: 11796480 bytes
95158272                           0x5AC0000                          UBI image, version: 1, image size: 2883584 bytes
98041856                           0x5D80000                          UBI image, version: 1, image size: 2359296 bytes
100401152                          0x5FC0000                          UBI image, version: 1, image size: 1572864 bytes
101974016                          0x6140000                          UBI image, version: 1, image size: 1572864 bytes
103546880                          0x62C0000                          UBI image, version: 1, image size: 1572864 bytes
105119744                          0x6440000                          UBI image, version: 1, image size: 1572864 bytes
106692608                          0x65C0000                          UBI image, version: 1, image size: 1441792 bytes
108134400                          0x6720000                          UBI image, version: 1, image size: 1310720 bytes
109445120                          0x6860000                          UBI image, version: 1, image size: 1179648 bytes
110624768                          0x6980000                          UBI image, version: 1, image size: 1310720 bytes
Although the addresses seem less random and before, I still don’t think binwalk could extract this dump the way the device’s embedded linux would do to get any usable result out of it. However, there is another way would work 100 percents, that is to extract it with the address mapping of each mtd we got from the boot log above. I copied the address table to file named map.txt, run my python script that uses dd under the hood to extract partition to parts/ directory.
poetry run python carve-mtds.py flashdump.bin.corrected.main map.txt
And voilà
$ ls Deco-X50-Firmware-Unpack/parts
mtd0.SBL1.bin       mtd11.rootfs.bin    mtd13.ETHPHYFW.bin      mtd15.runtime_data.bin  mtd2.BOOTCONFIG.bin   mtd4.QSEE.bin    mtd6.CDT.bin        mtd8.APPSBL.bin
mtd10.TRAINING.bin  mtd12.rootfs_1.bin  mtd14.factory_data.bin  mtd1.MIBIB.bin          mtd3.BOOTCONFIG1.bin  mtd5.DEVCFG.bin  mtd7.APPSBLENV.bin  mtd9.ART.bin
All the scripts are available in my Deco-X50-Firmware-Unpack repo
Anyway, carefully examining what’s inside of each, only these mtd11.rootfs.bin, mtd14.factory_data.bin and mtd15.runtime_data.bin files interest me.
Analyze It
Starting off with the partitions named rootfs and rootfs_1
$ binwalk3 Deco-X50-Firmware-Unpack/parts/mtd11.rootfs.bin
DECIMAL                            HEXADECIMAL                        DESCRIPTION
-----------------------------------------------------------------------------------------------------------------------
0                                  0x0                                UBI image, version: 1, image size: 32243712 bytes
-----------------------------------------------------------------------------------------------------------------------
The result is quite promising for this mtd11.rootfs.bin file. Let’s run it with ubireader_display_info from UBI Reaader
$ ubireader_display_info Deco-X50-Firmware-Unpack/parts/mtd11.rootfs.bin
UBI File
---------------------
        Min I/O: 2048
        LEB Size: 126976
        PEB Size: 131072
        Total Block Count: 336
        Data Block Count: 244
        Layout Block Count: 2
        Internal Volume Block Count: 0
        Unknown Block Count: 90
        First UBI PEB Number: 0

        Image: 1170313622
        ---------------------
                Image Sequence Num: 1170313622
                Volume Name:kernel
                Volume Name:ubi_rootfs
                PEB Range: 2 - 335

                Volume: kernel
                ---------------------
                        Vol ID: 0
                        Name: kernel
                        Block Count: 35

                        Volume Record
                        ---------------------
                                alignment: 1
                                crc: '0xc284678'
                                data_pad: 0
                                errors: ''
                                flags: 0
                                name: 'kernel'
                                name_len: 6
                                padding: '\x00\x00\x00\x00\x00\x00\x00\x00\x00\x00\x00\x00\x00\x00\x00\x00\x00\x00\x00\x00\x00\x00\x00'
                                rec_index: 0
                                reserved_pebs: 50
                                upd_marker: 0
                                vol_type: 'static'


                Volume: ubi_rootfs
                ---------------------
                        Vol ID: 1
                        Name: ubi_rootfs
                        Block Count: 209

                        Volume Record
                        ---------------------
                                alignment: 1
                                crc: '0x3d273eea'
                                data_pad: 0
                                errors: ''
                                flags: 0
                                name: 'ubi_rootfs'
                                name_len: 10
                                padding: '\x00\x00\x00\x00\x00\x00\x00\x00\x00\x00\x00\x00\x00\x00\x00\x00\x00\x00\x00\x00\x00\x00\x00'
                                rec_index: 1
                                reserved_pebs: 209
                                upd_marker: 0
                                vol_type: 'dynamic'
I found two volume: kernel and ubi_rootfs in that single mtd11.rootfs.bin, let’s extract them with ubireader_extract_images
$ ls ubifs-root/mtd11.rootfs.bin/
img-1170313622_vol-kernel.ubifs  img-1170313622_vol-ubi_rootfs.ubifs
I then run binwalk on the first vol-kernel file and got a FIT image recipe with lots of fdts with each one having a corresponding entry in the configurations section. The kernel as well as each fdt is embedded as a byte array under data attribute. In short, this file is a FIT image.
/dts-v1/;

/ {
	timestamp = <0x65100535>;
	description = "ARM64 OpenWrt FIT (Flattened Image Tree)";
	#address-cells = <0x01>;

	images {

		kernel@1 {
			description = "ARM64 OpenWrt Linux-4.4.60";
			data = <kernel as byte array>;
			type = "kernel";
			arch = "arm64";
			os = "linux";
			compression = "lzma";
			load = "A\b\0";
			entry = "A\b\0";

			hash@1 {
				value = <0xde989520>;
				algo = "crc32";
			};

			hash@2 {
				value = <0x6b659679 0x2d43328f 0x4d916607 0x6cf403f8 0xe26ccb6f>;
				algo = "sha1";
			};
		};

		fdt@db-mp03.1 {
			description = "ARM64 OpenWrt qcom-ipq50xx-mpxx device tree blob";
			data = <fdt as byte array>;
			type = "flat_dt";
			arch = "arm64";
			compression = "none";

			hash@1 {
				value = <0x42705678>;
				algo = "crc32";
			};

			hash@2 {
				value = <0x591d0d92 0x1da79ef 0xefba810f 0x86622d0a 0xbace69fb>;
				algo = "sha1";
			};
		};

                <alot more fdt>

		fdt@mp03.5-c2 {
			description = "ARM64 OpenWrt qcom-ipq50xx-mpxx device tree blob";
			type = "flat_dt";
			arch = "arm64";
			compression = "none";

			hash@1 {
				value = <0xd4c95510>;
				algo = "crc32";
			};

			hash@2 {
				value = <0x9c082466 0xfac37df9 0x21c88033 0x974ac1b7 0x13cf61ed>;
				algo = "sha1";
			};
		};
	};

	configurations {
		default = "config@mp03.5-c2";

		config@db-mp03.1 {
			description = "OpenWrt";
			kernel = "kernel@1";
			fdt = "fdt@db-mp03.1";
		};

                <alot more config for each fdt>

		config@mp03.5-c2 {
			description = "OpenWrt";
			kernel = "kernel@1";
			fdt = "fdt@mp03.5-c2";
		};
	};
};
Next, the second file that has vol-ubi_rootfs in its name is recognized as a Squashfs filesystem using file command. I unpacked it using unsquashfs
Just to make sure that the two partition mtd11 and mtd12 has the same kernel and rootfs, I checked the extracted kernels using md5sum and the results of unsquashfs, though I had to removed all the broken symlinks, they turned out to be the same
fedora › md5sum ubifs-root/mtd11.rootfs.bin/img-1170313622_vol-kernel.ubifs ubifs-root/mtd12.rootfs_1.bin/img-1170313622_vol-kernel.ubifs
27ae60292a3780ee7619d27964d168c8  ubifs-root/mtd11.rootfs.bin/img-1170313622_vol-kernel.ubifs
27ae60292a3780ee7619d27964d168c8  ubifs-root/mtd12.rootfs_1.bin/img-1170313622_vol-kernel.ubifs
fedora › diff -r squashfs-root squashfs-root1
fedora ›
Data partitions
Given that the rootfs is stored as SquashFS image which is immutable, user data and customization for the ISP should be stored elsewhere. mtd14.factory_data.bin and mtd15.runtime_data.bin are where I believe I should find my TP-Link user account info and ISP pppoe credential.
Running binwalk on these gives us a bunch of UBI image headers at what seemingly random offsets. From what I have learned reading here and there, these two are UBI volumes which when stored in mtd flash will have a bunch of header blocks for wear leveling. We’ll use ubireader_extract_files to read extract a file tree from all those blocks.
fedora › tree ubifs-root
ubifs-root
├── 1080750813
│   └── ubi_runtime_data
│       ├── device-config
│       ├── group-info
│       └── user-config
└── 1199603968
    └── ubi_factory_data
        └── product-info
product-info and group-info are text-based while device-config and user-config are recognized as just data using file command.
group-info
vendor_name:TP-LINK
vendor_url:www.tp-link.com
product_name:X50
product_type:HOMEWIFISYSTEM
language:US
product_ver:1.0.0
product_id:04D50100
special_id:43410000
hw_id:CCF852C3B5F2DEAEC78EA5A318D769CB
oem_id:1B2077AB5B44FA21F0B608D979A36B10
country:US
key:<some public ssh key that I discovered to be used for>
gid:<look like some sort of uuid, it is the seed for our decryption key later>
group-info
{"role":"AP","key":"same public key above","gid":"same uuid"}
Run binwalk -E to get a entropy for the content of those two, the result like more or less the same, they’re probably encrypted
Now it’s just the matter of finding the key and procedure for decrypting them inside the rootfs we found earlier
Initially I tried to grep for ‘user-config’ on the output of strings of the img-1170313622_vol-ubi_rootfs.ubifs file and found no match, but I then realized the file was recognized as ‘Squashfs filesystem, little endian, version 4.0, xz compressed’. So that explains it, it’s all because of compression all along.
Grepping the extracted squashfs directory gives much better results, consisting of text-based and binary file
fedora › grep -r 'user-config' squashfs-root
squashfs-root/fw_data/partition-table:25=        user-config,0x00000000,0x00000000, 3, 2, 0, 4, bin/manufacture-userconf.bin
squashfs-root/sbin/fullband-switch:             cfg.saveconfig("user-config")
squashfs-root/sbin/saveconfig:elseif part == "u" or part == "user-config" then
squashfs-root/sbin/saveconfig:    param = "user-config"
squashfs-root/sbin/saveconfig:    print("Warning: saving user-config is for debug only")
squashfs-root/lib/sync-server/scripts/sync-config:    rc = subprocess.call({"nvrammanager", "-p", "user-config", "-r", config_file})
squashfs-root/lib/sync-server/scripts/probe:                                dbg("old firmware will not do user-config sync " .. devid)
squashfs-root/lib/sync-server/scripts/force-sync:       rc = subprocess.call({"nvrammanager", "-p", "user-config", "-r", config_file})
squashfs-root/usr/sbin/report_upload_components:        cfg.saveconfig("user-config")
squashfs-root/usr/sbin/report_upload_components:cfg.saveconfig("user-config")
squashfs-root/usr/sbin/homecare_check:    cfg.saveconfig("user-config")
squashfs-root/usr/sbin/sync-check:        cfg.saveconfig("user-config")
grep: squashfs-root/lib/libtr098.so: binary file matches
grep: squashfs-root/usr/bin/nvrammanager: binary file matches
grep: squashfs-root/usr/bin/tddp: binary file matches
grep: squashfs-root/usr/bin/cwmp: binary file matches
grep: squashfs-root/usr/bin/crytool: binary file matches
grep: squashfs-root/usr/lib/lua/update-info.lua: binary file matches
grep: squashfs-root/usr/lib/lua/luci/sys/re-config.lua: binary file matches
grep: squashfs-root/usr/lib/lua/luci/sys/config.lua: binary file matches
grep: squashfs-root/usr/lib/lua/luci/model/app_timesetting.lua: binary file matches
grep: squashfs-root/usr/lib/lua/luci/model/accountmgnt.lua: binary file matches
grep: squashfs-root/usr/lib/lua/luci/model/manager.lua: binary file matches
grep: squashfs-root/usr/lib/lua/luci/controller/admin/mobile_app/device.lua: binary file matches
grep: squashfs-root/usr/lib/lua/luci/controller/admin/device.lua: binary file matches
grep: squashfs-root/usr/lib/lua/luci/controller/admin/sync.lua: binary file matches
Looking through those text files first which mostly lua scripts, I noticed they are all referenced to a module that enabled them to save the user-config. Here is an example
#!/usr/bin/lua

local config = require "luci.sys.config"
local param = nil
local part = arg[1]

if part == "a" or part == "all" then
    param = nil
elseif part == "u" or part == "user-config" then
    param = "user-config"
elseif part == "cw" or part == "cwmp-config" then
    param = "cwmp-config"
else
    param = "device-config"
end

if param ~= "device-config" then
    print("Warning: saving user-config is for debug only")
end

config.saveconfig(param)
And one of the matches from earlier has that name squashfs-root/usr/lib/lua/luci/sys/config.lua, and it’s lua bytecode. Checking out its content with string, here are some interesting lines
nvrammanager -w /tmp/save-userconf.cry -p user-config >/dev/null 2>&1
nvrammanager -e -p user-config >/dev/null 2>&1
nvrammanager is a executable binary
Usage: nvrammanager [OPTIONS1] [OPTIONS2]
[OPTIONS1]
  -r, --read=FILE                  Read partition to FILE
  -w, --write=FILE                 Write FILE to partition
  -e, --erase                      Erase partition
  -s, --show                       Show partition table
  -u, --upgrade=FILE               Upgrade firmware from FILE
  -c  --check=FILE                 Check whether the firmware is valid
  -f, --factory                    Force reset to factory config after upgrade
  -h, --help                       Display usage
  -i, --init                                            setup system and profile info to directory /tmp/
[OPTIONS2]
  -p, --partition=PTN_NAME         Partition name. It's needed when OPTIONS1(-r or -w or -e) exists.
So the -p from the lines is the partition name, and what the binary will write -w is the encrypted version of what we looking for. Something else must have created that save-userconf.cry file before the binary was called.
Going back to lua bytecode earlier, the file seems to have been created through a function named ‘enc_file_entry_prv’ before the command got called
user-config
fileToXml
/tmp/save-userconf.xml
is_user_config
enc_file_entry_prv
/tmp/save-userconf.cry
execute
nvrammanager -w /tmp/save-userconf.cry -p user-config >/dev/null 2>&1
Grepping rootfs again for ‘enc_file_entry_prv’ led us to
squashfs-root/usr/lib/lua/luci/model/crypto.lua
After looking a decompiler for lua bytecode to make the process less painful, it eventually had to settle for a mix of this luadec for disassembling the bytecode into a bunch assembly-looking instructions and ChatGPT for turning them into a human-readable format. This tool proves to be quite valuable later on when we need to make sense to the imported files.
docker build -f docker/luadec.Dockerfile -t luadec .
docker run -it --rm -v $PWD:/data luadec
# inside container
luadec -dis /data/crypto.lua > /data/crypto.dis
Taking a look at the disassembled lua file crypto.dis, I would say it’s not that hard to read it and find what is relevant to our goal. I find it cumbersome to decode some long functions, so let’s ask for a more human-readable version from ChatGPT. Here are my naming convention I used since we’ll be dealing with a few more lua bytecode files when digging deeper. Bytecode file named crypto.lua will have the disassembled version named crypto.dis and AI-aided decompiled version named crypto-ai.lua. Similarly, extracted file config.lua after disassembled will be named config.dis and decompiled as config-ai.lua. Again all the work is saved in my GitHub repo if you want to have a look for yourself.
We already know that function crypto.enc_file_entry_prv creates this /tmp/save-userconf.cry that will then be saved into flash using the nvrammanager executable from looking at the strings extracted from config.lua. Now that we’ve got the tool to decompile any luabyte code, let’s do that for this file as well to know exactly how what parameters crypto.enc_file_entry_prv was called with.
Here we found it to be part of function config.saveconfig which is actually being used alot in many text-based uncompiled lua files through the rootfs
    -- Save user config
    if configType == "user-config" or configType == "ALL" or configType == nil then
        -- This one create the xml file with user-config data
        fileToXml("/tmp/save-userconf.xml", is_user_config)
        crypto.enc_file_entry_prv("/tmp/save-userconf.xml", "/tmp/save-userconf.cry")
        os.execute("nvrammanager -w /tmp/save-userconf.cry -p user-config >/dev/null 2>&1")
        os.execute("rm -f /tmp/save-userconf.xml /tmp/save-userconf.cry >/dev/null 2>&1")
    end
This means that there must be a equivalent function for decryption being used somewhere inside this config.lua file.
As expected, we found it being referenced inside this config.loadConfigToFiles
    -- Decrypt the .cry to .xml
    if partition == "user-config" or partition == "device-config" then
        crypto.dec_file_entry_prv("/tmp/" .. partition .. ".cry", "/tmp/" .. partition .. ".xml")
    else
        crypto.dec_file_entry("/tmp/" .. partition .. ".cry", "/tmp/" .. partition .. ".xml")
    end
At this state, in order to proceed further in the research, I had to figures out how the function parameters and external function calls are being passed into each decompiled function. ChatGPT didn’t take the whole disassembled lua code so I had to send it each function separately and put them together in *-ai.lua files. This means that external functions / global variables that need to be used inside each of them have to be passed as upvalues. Here my brief guide on reading this assembly-looking lua
- There is this one global function named
0in the begining of this disassembled lua bytecode that declare what functions are exported usingSETGOBALoptcode and what string constants are usingLOADK. All internal function stillclosure(Function 0_<some number>(I renamed it for ease of reading) but have won’t be assigned a name like line 137.63 [-]: LOADK R19 K23 ; R19 := "2EB38F7EC41D4B8E1422805BCD5F740BC3B95BE163E39D67579EB344427F7836" 64 [-]: LOADK R20 K24 ; R20 := "360028C9064242F81074F4C127D299F6" 65 [-]: LOADK R21 K25 ; R21 := "-K " 66 [-]: MOVE R22 R19 ; R22 := R19 67 [-]: LOADK R23 K26 ; R23 := " -iv " 68 [-]: MOVE R24 R20 ; R24 := R20 69 [-]: CONCAT R21 R21 R24 ; R21 := concat(R21 to R24) ... 162 [-]: CLOSURE R33 21 ; R33 := closure(Function #dec_file_entry_prv) 163 [-]: MOVE R0 R26 ; R0 := R26 164 [-]: MOVE R0 R24 ; R0 := R24 165 [-]: SETGLOBAL R33 K45 ; dec_file_entry_prv := R33 dec_file_entry_prvwas actuallyclosure(Function 0_9)and it has 2 upvalues (U0andU1) according to its signature. The two values being assigned to R0 on line 163 and 164 areU0andU1respectively.; Function: dec_file_entry_prv() ; Defined at line: 451 ; #Upvalues: 2 ; #Parameters: 3 ; Is_vararg: 0 ; Max Stack Size: 9- When assigned to be
U0, R32 was set to functionprepare_group_infoand the value of R24 which was the string ‘default’ was used forU172 [-]: LOADK R24 K29 ; R24 := "default" 73 [-]: LOADK R25 K30 ; R25 := "prv" 74 [-]: CLOSURE R26 0 ; R26 := closure(Function #prepare_group_info) - Function
dec_file_entry_prvhas 3 parameters and I renamed them based on what I believe them to represent and replace theU0,U1with what they were assigned tofunction dec_file_entry_prv(input_file, output_file, arg2) -- Call upvalue U0, returns two values local enc_type, seed = prepare_group_info() if enc_type == "default" then return enc_file_entry(input_file, output_file, arg2) end -- Check if OpenSSL crypto is used if crypt_used_openssl() then -- Use enc_file_prv to decrypt, then dump result to file local data = enc_file_prv(input_file, false, seed) dump_to_file(data, output_file) else -- Fallback to WolfSSL decryption with unknown type error wolfssl_enc_dec_file(input_file, output_file, "Unknown_Type_Error") end return endThat’s my two cents on the process. Let’s speed things up before this post becomes overwhelmingly long.
Here are what prepare_group_info and enc_file_prv look like , we won’t go into wolfssl_enc_dec_file since our rootfs has openssl.
function prepare_group_info()
    local info = sync["read_group_info"]()

    if info and info.gid and info.role then
        return 'prv', info.gid
    else
        return 'default'
    end
end
function enc_file_prv(path, toCompress, seed)
  if type(path) ~= "string" or #path == 0 then
    return nil
  end
  local cmd = construct_cmd(path, toCompress, true, seed) -- U0
  local io_util = utils  -- Upvalue U1
  return io_util.ltn12_popen(cmd)
end
and their callees
function read_group_info()
    local lock = locker.RWLocker('/var/run/group-info.lock')
    lock:rlock()
    if not nixio.fs["access"]('/tmp/group-info') then
        local cmd = {
            "nvrammanager", "-r", '/tmp/group-info', "-p", U4
        }
        local result = subprocess.call(cmd)
        if result == nil then
            return nil, "read partition"
        end
    end
    local f = io.open('/tmp/group-info', "r")
    _G.f = f
    if not f then
        return nil, "open file"
    end
    local raw = f:read("*a")
    local decoded = json["decode"](raw)
    f:close()
    lock:ulock()
    return decoded or {}, nil
end
function construct_cmd(input_file, toCompress, flag, seed)
  local derived_key = read_file_if_fail_call_fallback_loader(seed)
  local key_n_iv = "-K ".. derived_key .." -iv 360028C9064242F81074F4C127D299F6"
  local cmd_template
  if flag then
    if toCompress then
      cmd_template = 'openssl aes-256-cbc -e %s %s' or 'openssl zlib -e %s | openssl aes-256-cbc -e %s'
    else
      cmd_template = 'openssl zlib -e %s | openssl aes-256-cbc -e %s'
    end
  else
    if toCompress then
      cmd_template = 'openssl aes-256-cbc -d %s %s' or 'openssl aes-256-cbc -d %s %s | openssl zlib -d'
    else
      cmd_template = 'openssl aes-256-cbc -d %s %s | openssl zlib -d'
    end
  end
  local input_path
  if input_file then
    local mod_result = '-in %q' % input_file
    input_path = mod_result or ""
  else
    input_path = ""
  end
  local inputs = { input_path, key_n_iv }
  local result = cmd_template % inputs
  return result
end
and one more
local function fallback_loader(the_file)
    local normalized = string.upper(string.gsub(the_file, "-", ""))
    local secret = '2EB38F7EC41D4B8E1422805BCD5F740BC3B95BE163E39D67579EB344427F7836'  -- U0 is assumed to be a secret string (e.g., a key)
    local cmd = "echo " .. secret .. " | openssl sha256 -hmac " .. normalized .. " -r"
    local exec_fn = U1.exec  -- U1 is a table with an 'exec' function
    local output = exec_fn(cmd)
    local cleaned = string.upper(string.gsub(output, "*[%a,%c]+", ""))
    local handler = write_cleaned_into_file_so_it_wont_call_this_again()  -- the file is `/tmp/<the_file>`
    handler(cleaned, the_file)
    return cleaned
end
Keep in mind that I renamed, populated and skipped many time consuming referencing back and forth to get to these function. In short, function dec_file_entry_prv and dec_file_entry from the code I shown above in config.loadConfigToFiles are basically calling openssl under the hood with a key generated from some seed with a hardcoded secret and iv in this crypto.lua bytecode.The difference between the two functions dec_file_entry don’t use the seed gid from this group-info file while dec_file_entry_prv does.
Putting all together, we got two nicely looking commands that will generate a key and decrypt your user-config and device-config without emulating arm using qemu like I did the first time to test out running enc_file_entry_prv from lua interactive shell. Also if you were to emulate arm and chroot into our extracted rootfs, I learned it from this post by skowronski.tech, but the method didn’t work for me since these new Deco took away more of our control by not even allowing exporting backup file
# generate key from seed
echo 2EB38F7EC41D4B8E1422805BCD5F740BC3B95BE163E39D67579EB344427F7836 | openssl sha256 -hmac <gid as your seed from group-info file without dash and uppercased> -r
# copy the key from output and discard *stdin at the end to decrypt
openssl aes-256-cbc -d -in user-config -K <your key goes here> -iv 360028C9064242F81074F4C127D299F6 | openssl zlib -d > user-config.xml
I don’t know if I should keep this
gida secret
To be continued …
RootFS
I unpacked and traversed the rootfs tree and found some interesting text-based scripts
/etc/tr098_ap.xml
/etc/tr098.xml
/etc/tr181_ap.xml
/etc/tr181.xml

/lib/isp_center/scripts/check_abnormal_status

/usr/bin/tr069/check_device_sn
/usr/bin/tr069/check_params
/usr/bin/tr069/generate_hosts
/usr/bin/tr069/generate_meshinfo
/usr/bin/tr069/get_trace_result
/usr/bin/tr069/get_wifimac
/usr/bin/tr069/upgrade_by_tr069

/usr/lib/wanDetect/disconnect_lan_eth.sh
/usr/lib/wanDetect/disconnect_lan_sgmac.sh
/usr/lib/wanDetect/port_detect.sh
/usr/lib/wanDetect/set_static_mac.sh
/usr/lib/wanDetect/set_vlan.sh

/usr/sbin/cloud_pre_config_get
/usr/sbin/dcmp_tool

/usr/sbin/ntpops
/usr/sbin/polling_dial_detection
/usr/sbin/swconfig_load