Attempt Debian install on my WiFi router
Last year, as I was on the hunt for some cheap routers with interesting features as a hobby (yes I’m kind of a router enjoyer myself, but people collect weird things all the time, aren’t they), I stumbled upon this rare species, the Linksys EA7500v3 (specs below) which unlike many other Linksys models has ARM CPU. I specifically only look for those with mediatek chips because these have great support in Linux. Later on, I discovered that those wireless chips in this particular CPU have yet to get any open source driver support in OpenWRT, also the second ARM doesn’t work in OpenWRT. In the end, I bought it anyway because without wireless, this could still be a good host for experimenting with custom linux build and a greate oppotunity for me to learn some kernel driver development.
Specs:
- CPU: MediaTek MT7629BA ARMv7-A x2
- RAM: Nanya NT5CC128M16JR-EK 256MiB
- Flash: Macronix MX35LF1GE4AB 128MiB SNAND
- Wireless: MediaTek MT7761N, MT7762N
- Wire: MediaTek MT7531BE
- Unique features: none
Contents
- Contents
- Get It Open
- Explore u-boot
- Dump the stock firmware
- I did messed it up the first time
- Recover
- Set up a test network
- Build custom u-boot
- Build custom linux
- Build a FIT image
- First linux test boot
Get It Open
I like these new Linksys router for the sturdy shell which has a smaller footprint than their previous design and seems like it could take some beating before it breaks, but man I hate it every single time I have to crack it open with those dump clips that just break off afterward or warp the hell out the edges.
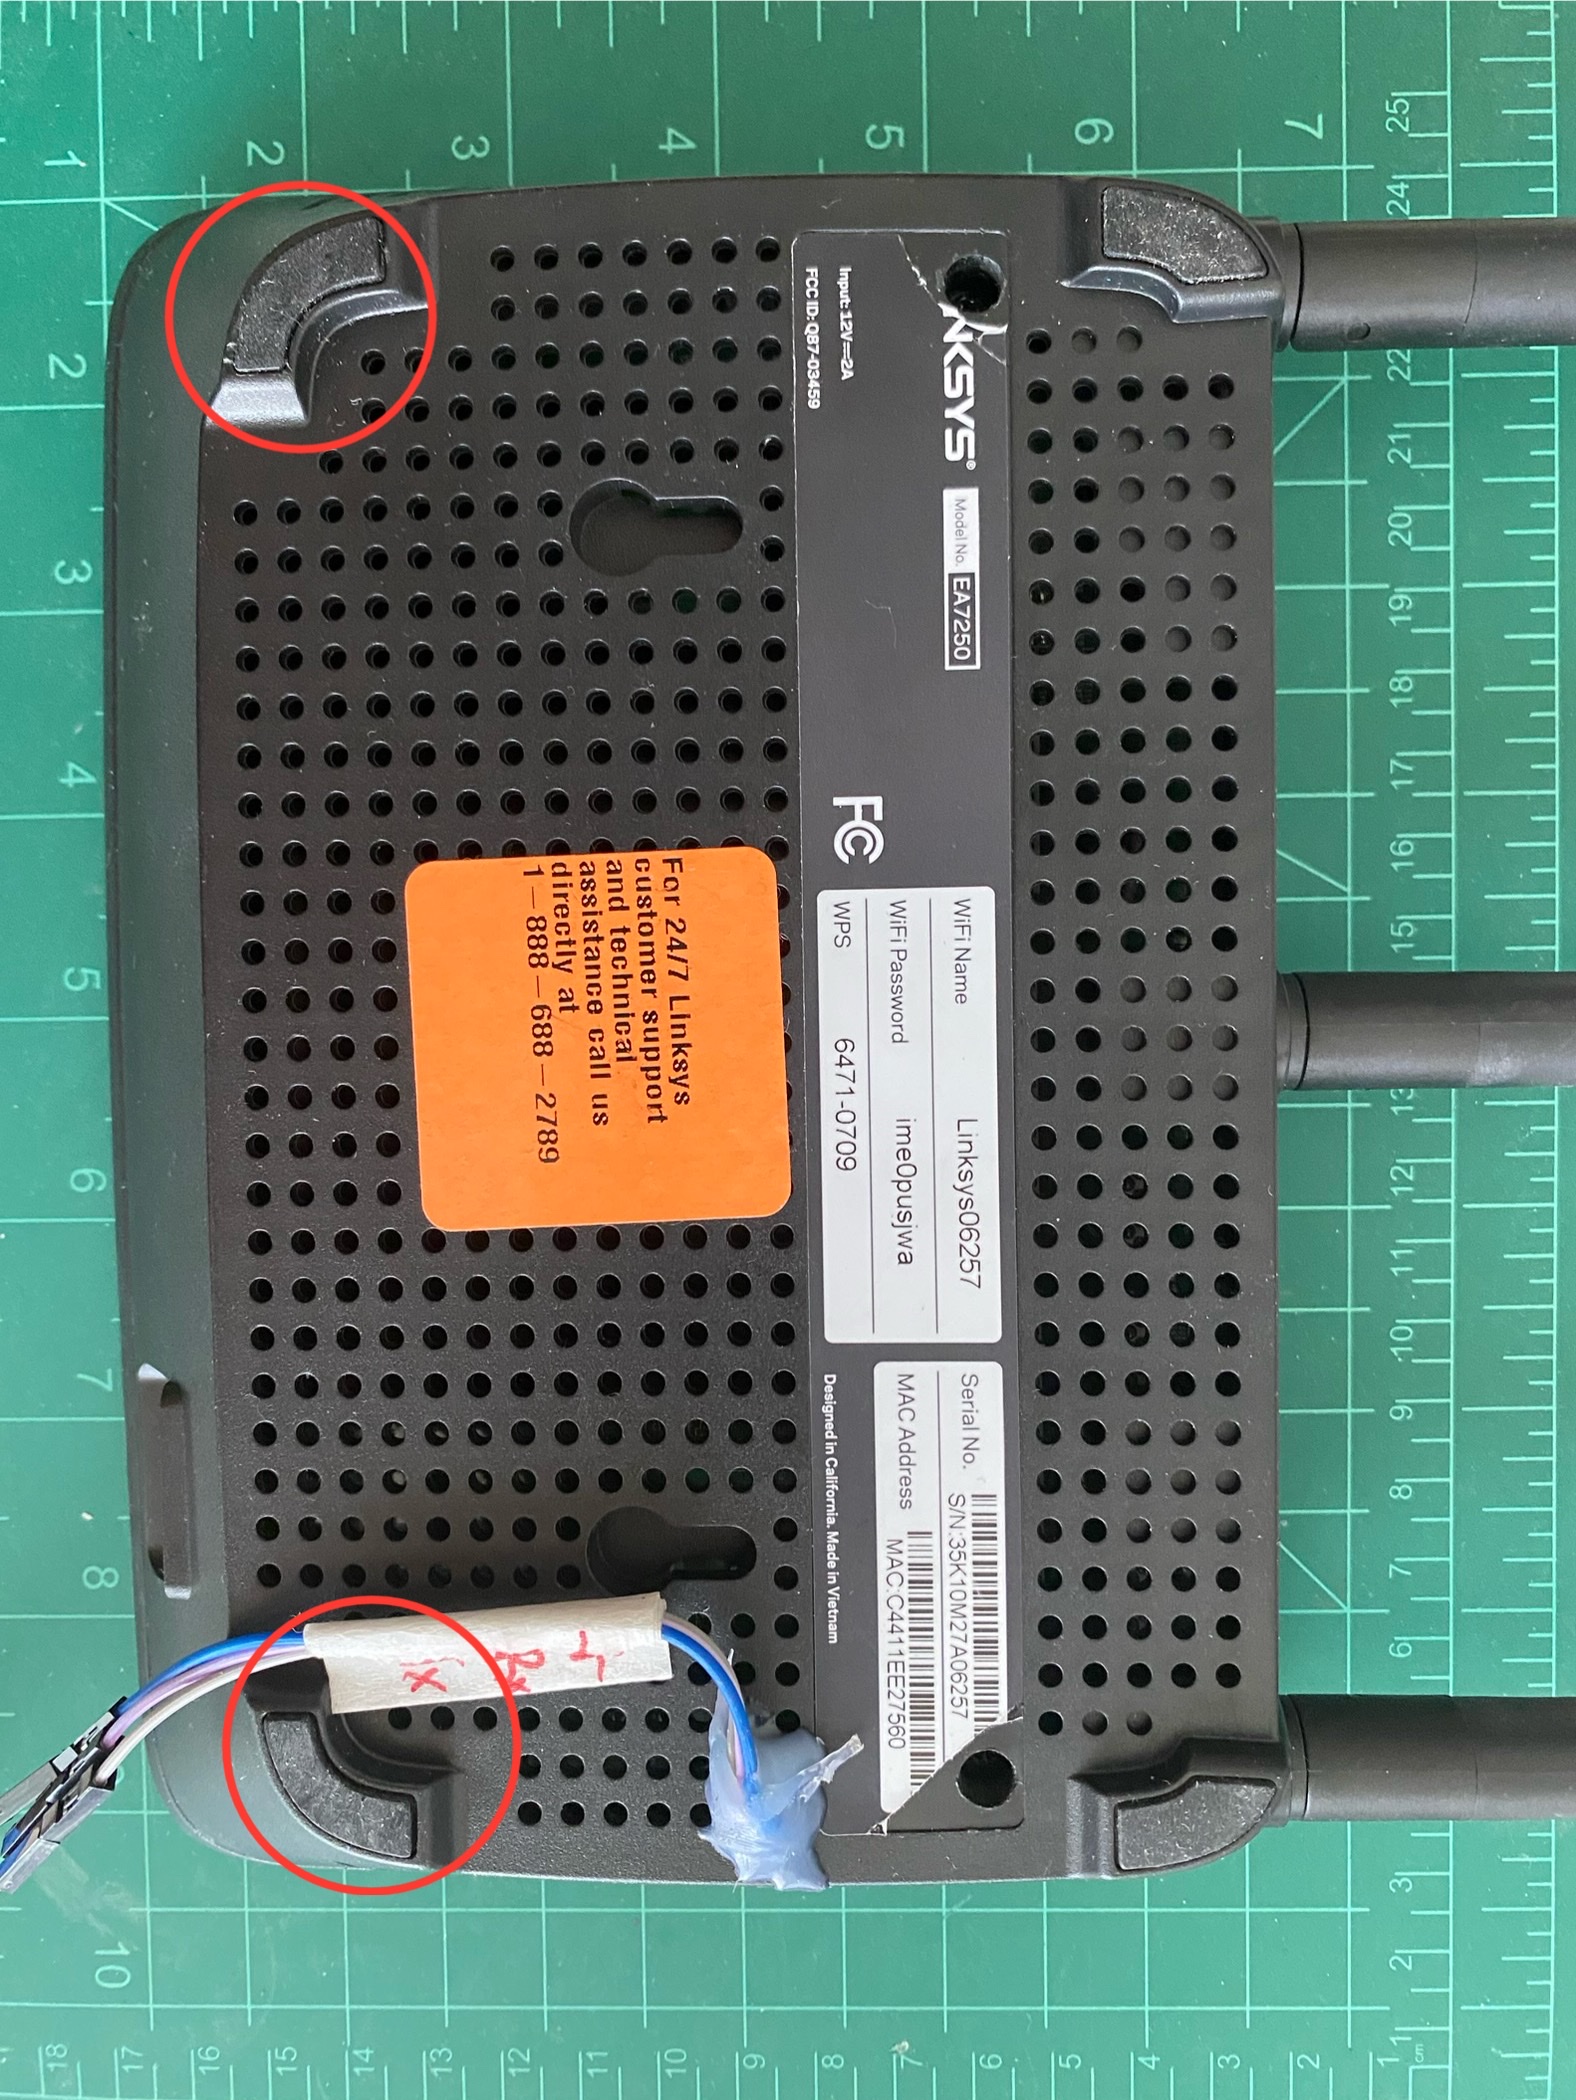
Anyway, I got it open with 4 screws, 2 under the label and 2 under the rubber feet. Please don’t mind the dust and my glue job there.
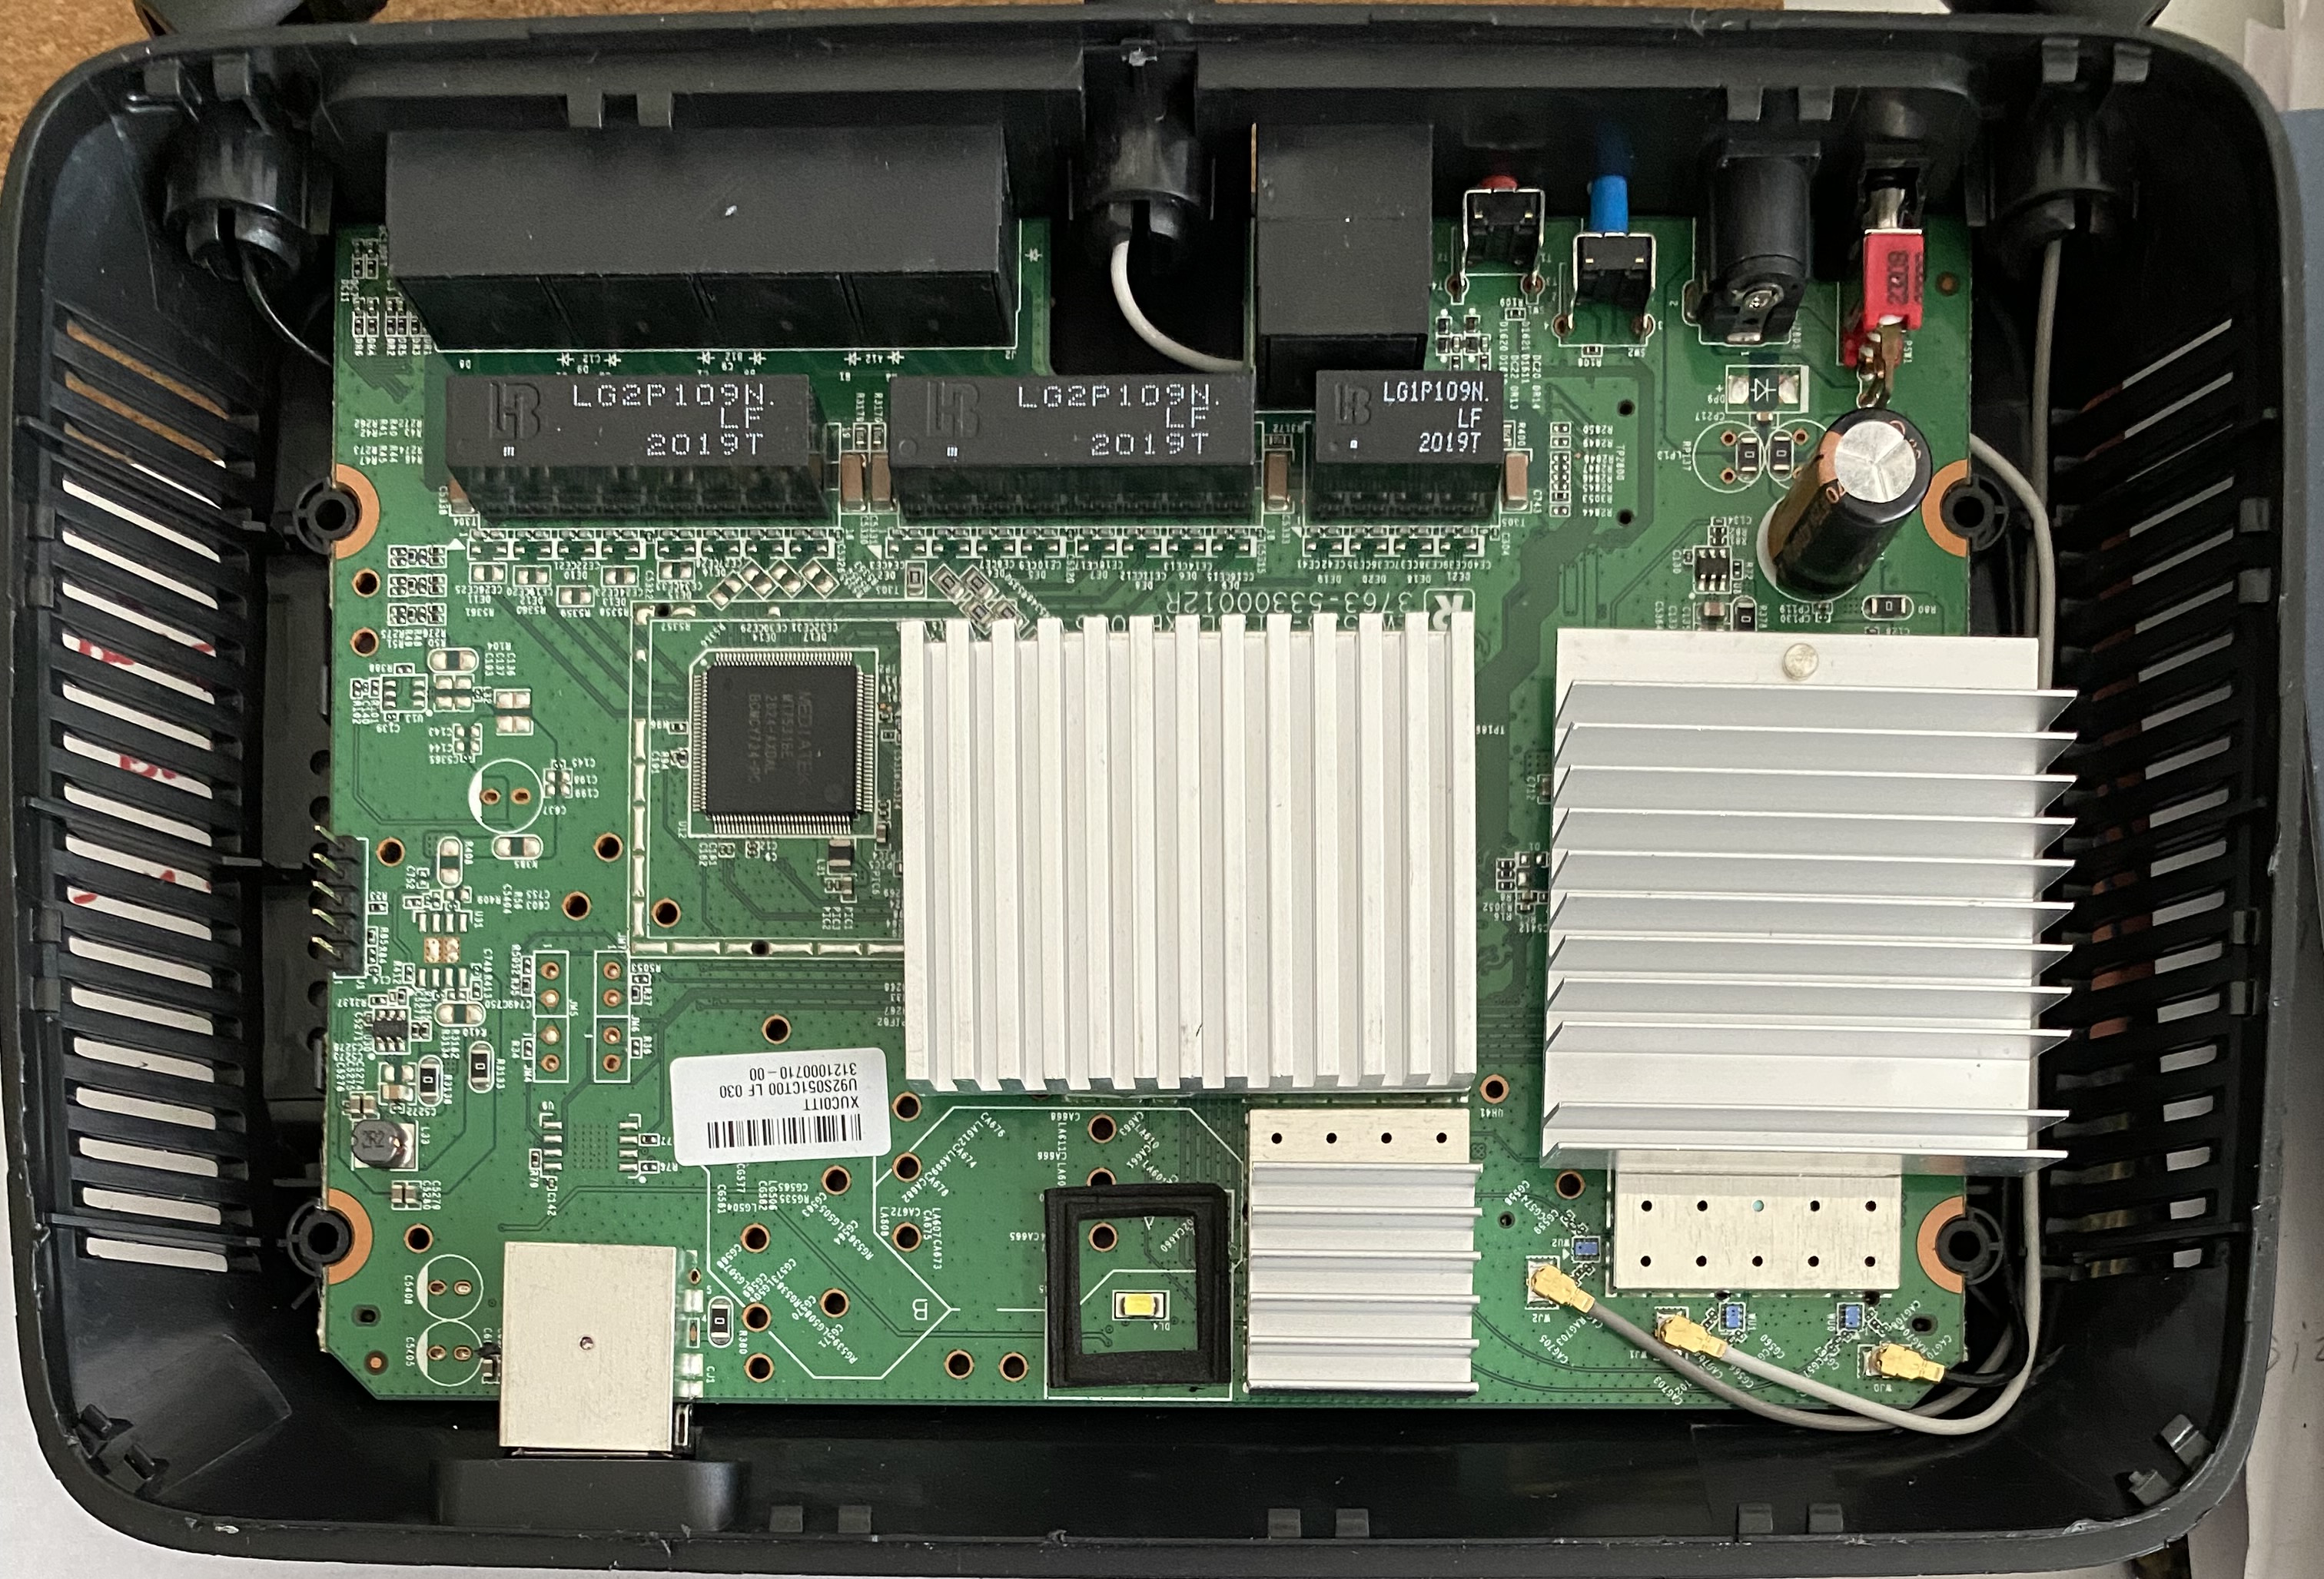
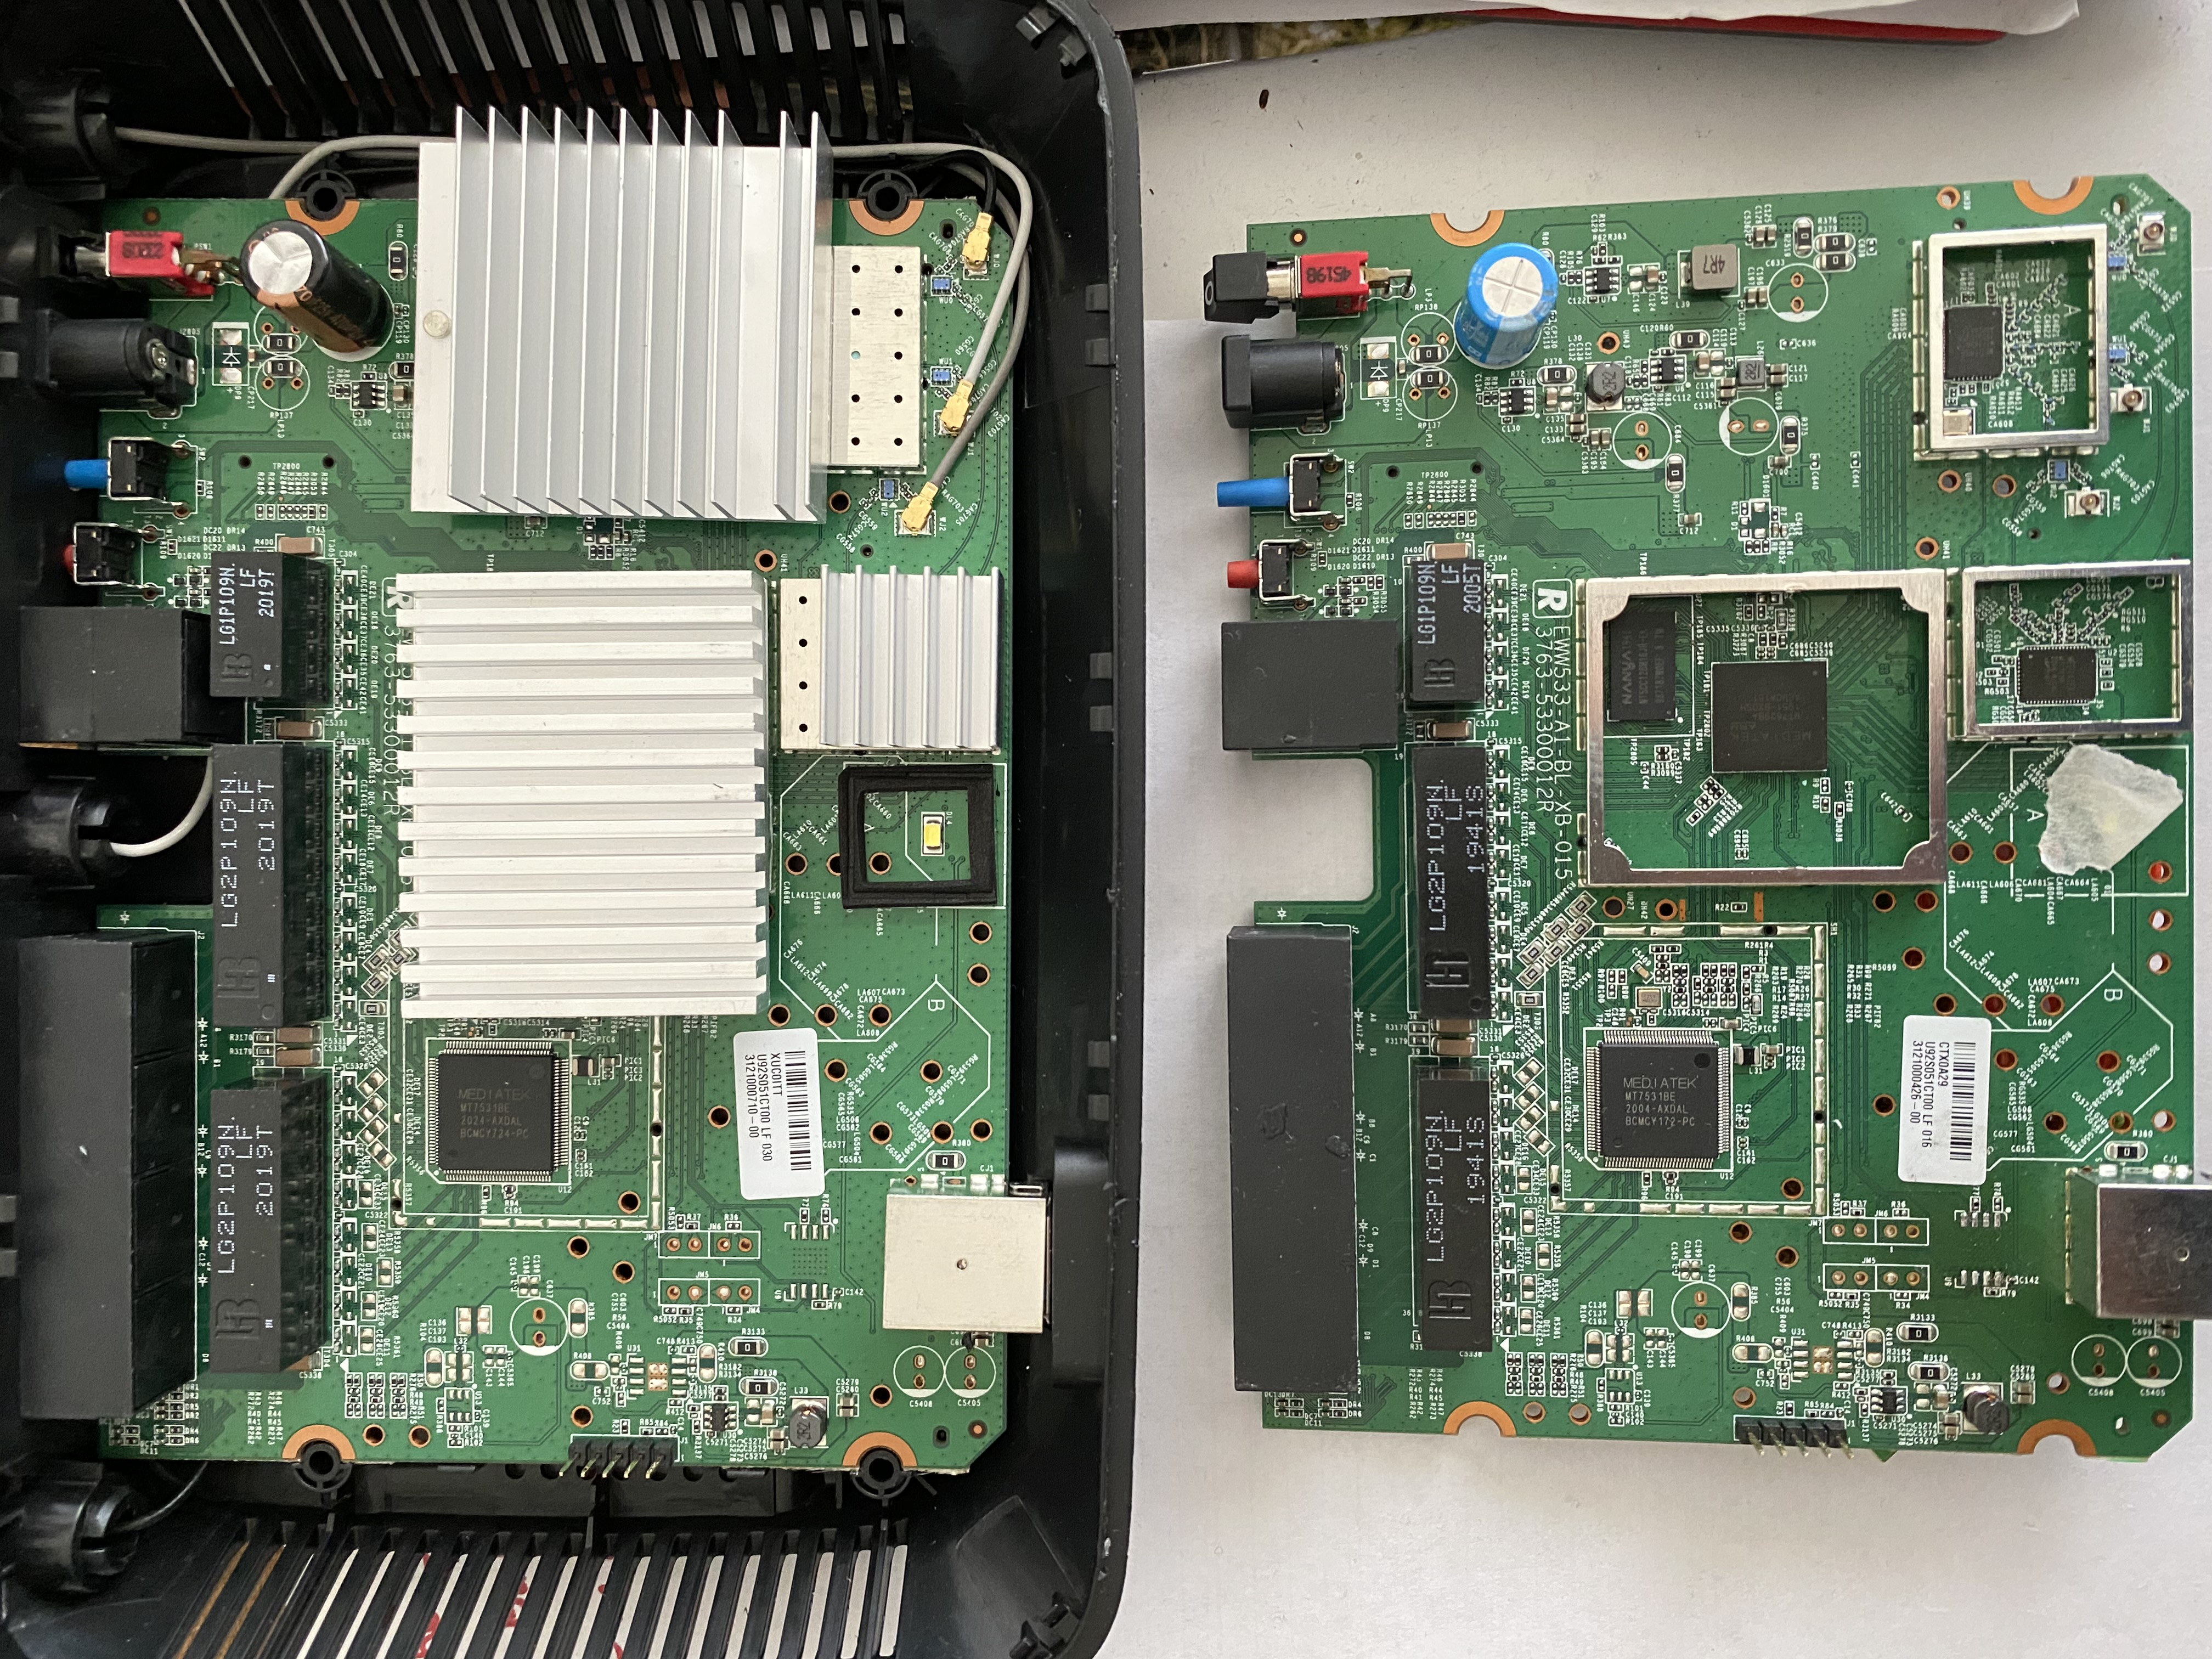
The board is identical to the one in the Linksys EA7250 which bought recently, in fact, there’s nothing to distinguish the two from the outside aside from their labels on the bottom. Here is a pcb comparison, top is EA7250, bottom is EA7500v3.
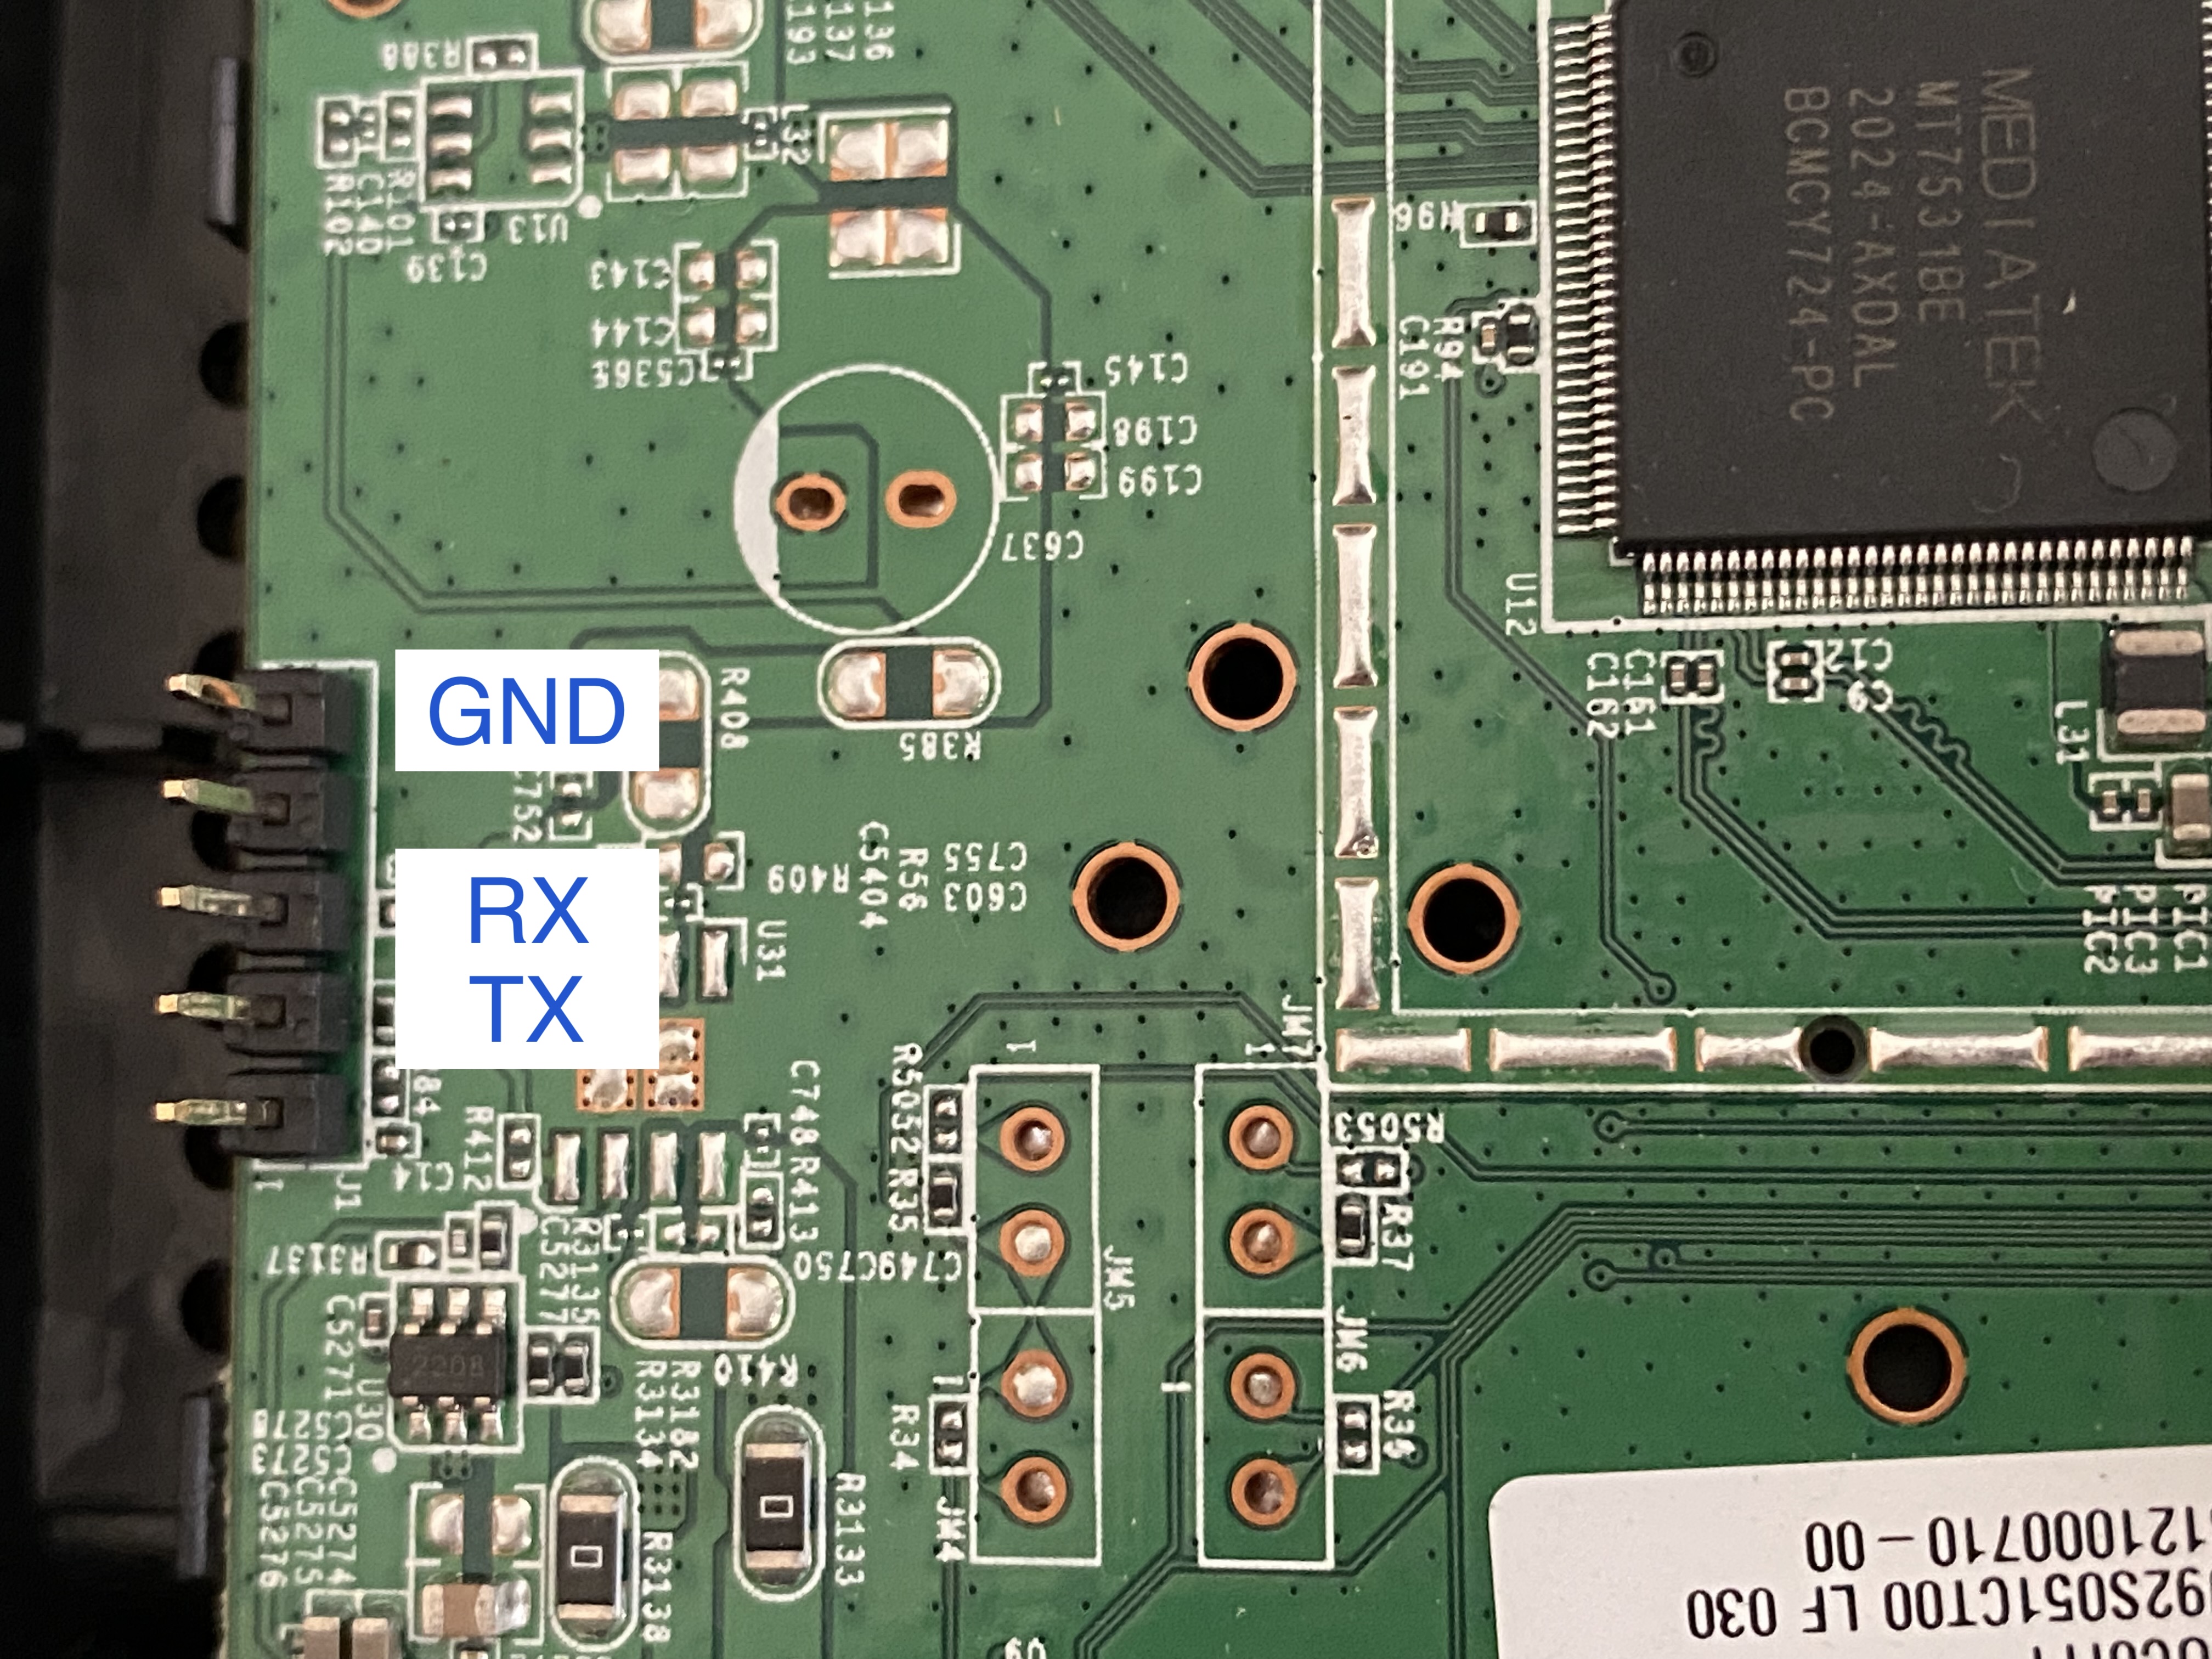
Both PCBs have the jumper header pins populated on their left edges. No visible marking on which is which, but we all know that’s UART and it’s trivial to figure them out with a multimeter by checking their connectivity (powered OFF) and voltage level (powered ON):
- If pin X is connected to some large metal shell of a USB connector or eletromagnetic shield (those right under the heatsinks) -> that’s Ground
- When the device powered on, if pin X voltage is constantly at 3.3v or 5v, it could either be VCC or RX
- If pin X voltage keeps changing, that’s TX
We only need 3 pins to talk to it, here’s what I found
Explore u-boot
First object: Dump the firmware
There are generally two way to go around this, but in my book and from ‘experience’ I have narrowed it down to just this one way that I swear by: Kindly ask u-boot to give it to me one piece at a time. Also we should also see what else the stock u-boot can do while we’re at it.
MT7629> help
?       - alias for 'help'
backup_message- print backup message.
base    - print or set address offset
bdinfo  - print Board Info structure
boot    - boot default, i.e., run 'bootcmd'
bootd   - boot default, i.e., run 'bootcmd'
bootm   - boot application image from memory
bootmenu- ANSI terminal bootmenu
bootp   - boot image via network using BOOTP/TFTP protocol
chpart  - change active partition
cmp     - memory compare
coninfo - print console devices and information
cp      - memory copy
crc32   - checksum calculation
custom_image_check- check if image in load_addr is normal.
download_setting- set download image file name , and device IP , server IP before upgrade
echo    - echo args to console
editenv - edit environment variable
env     - environment handling commands
esw_read- esw_read   - Dump external switch/GMAC status !!

exit    - exit script
false   - do nothing, unsuccessfully
fdt     - flattened device tree utility commands
filesize_check- check if filesize of the image that you want to upgrade is normal.
go      - start application at address 'addr'
gpio_dump- enable utif debug function.
help    - print command description/usage
image_blks- read image size from img_size or image header if no specifying img_size, and divided by blk_size and save image blocks in image_blks variable.
image_check- check if image in load_addr is normal.
iminfo  - print header information for application image
imxtract- extract a part of a multi-image
invaild_env- need to invaild env.
itest   - return true/false on integer compare
loadb   - load binary file over serial line (kermit mode)
loads   - load S-Record file over serial line
loadx   - load binary file over serial line (xmodem mode)
loady   - load binary file over serial line (ymodem mode)
loop    - infinite loop on address range
md      - memory display
mdio    - mdio   - Mediatek PHY register R/W command !!

mm      - memory modify (auto-incrementing address)
mtdparts- define flash/nand partitions
mtk_image_blks- read image size from image header (MTK format) located at load_addr, divided by blk_size and save image blocks in image_blks variable.
mw      - memory write (fill)
n9_jtag - switch GPIO to AUX6 for N9 jtag debug.
n9_uart - switch GPIO to AUX6 for N9 UART output.
nand    - NAND sub-system
nboot   - boot from NAND device
nm      - memory modify (constant address)
ping    - send ICMP ECHO_REQUEST to network host
printenv- print environment variables
reco_message- print recovery message.
reg     - reg   - Mediatek PHY register R/W command !!

reset   - Perform RESET of the CPU
run     - run commands in an environment variable
saveenv - save environment variables to persistent storage
serious_image_check- seriously check if image in load_addr is normal.
setenv  - set environment variables
showvar - print local hushshell variables
sleep   - delay execution for some time
snor    - snor   - spi-nor flash command

source  - run script from memory
test    - minimal test like /bin/sh
tftpboot- boot image via network using TFTP protocol
true    - do nothing, successfully
uboot_check- check if uboot in load_addr is normal.
uid     - uid    - Read Unique ID from spi-nor flash

utif_debug- enable utif debug function.
version - print monitor, compiler and linker version
And of course we have to get the environment variables
MT7629> printenv
arch=arm
auto_recovery=yes
baudrate=115200
board=leopard_evb
board_name=leopard_evb
boot0=download_setting kernel;tftpboot ${loadaddr} ${kernel_filename};bootm
boot1=download_setting kernel;tftpboot ${loadaddr} ${kernel_filename};run boot_wr_img;run write_image2;run boot_rd_img;bootm
boot2=run boot_rd_img;bootm
boot3=download_setting uboot;tftpboot ${loadaddr} ${uboot_filename};run wr_uboot;invaild_env
boot4=loadb;run wr_uboot;invaild_env
boot5=download_setting ctp;tftpboot ${loadaddr} ${ctp_filename};run wr_ctp
boot6=run wr_cumstom_image;invaild_env
boot7=download_setting flashimage;tftpboot ${loadaddr} ${flashimage_filename};run wr_flashimage;invaild_env
boot8=nand read ${loadaddr} 0x29c0000 0x2800000;nand erase.spread 0x1C0000  0x2800000;image_blks 2048;nand write ${loadaddr} 0x1C0000 0x2800000;run boot2
boot9=nand read ${loadaddr} 0x29c0000 0x2000;image_blks 2048;nand read ${loadaddr} 0x29c0000 ${img_align_size};bootm
boot_part=2
boot_part_ready=3
boot_rd_ctp=nand read 0x40000000 0x1C0000 0xF20000
boot_rd_img=nand read ${loadaddr} 0x1C0000 0x2000;image_blks 2048;nand read ${loadaddr} 0x1C0000 ${img_align_size}
boot_ver=0.1.3
boot_wr_img=filesize_check 0x2800000;if test ${filesize_result} = good; then image_blks 131072;nand erase.spread 0x1C0000  ${filesize};image_blks 2048;nand write ${loadaddr} 0x1C0000 ${filesize};fi
bootcmd=No
bootdelay=3
bootfile=lede_uImage
bootimage=2
bootmenu_0=1. System Load Linux to SDRAM via TFTP.=run boot0
bootmenu_1=2. System Load Linux Kernel then write to Flash via TFTP.=run boot1
bootmenu_2=3. Boot system code via Flash.=run boot2
bootmenu_3=4. System Load U-Boot then write to Flash via TFTP.=run boot3
bootmenu_4=5. System Load U-Boot then write to Flash via Serial.=run boot4
bootmenu_5=6. System Load CTP then write to Flash via TFTP.=run boot5
bootmenu_6=7. Debugger load image then write to Flash.=run boot6
bootmenu_7=8. System Load flashimage then write to Flash via TFTP.=run boot7
bootmenu_delay=30
cbt_env_flag=1
cpu=armv7
ctp_filename=ctp.bin
ethact=mtk_eth
ethaddr=00:0C:E7:11:22:33
flashimage_filename=flashimage.bin
invaild_env=no
ipaddr=192.168.1.1
kernel_filename=7531.bin
loadaddr=0x42007F1C
recovery_enable=1
serverip=192.168.1.100
soc=leopard
stderr=serial
stdin=serial
stdout=serial
uboot_filename=u-boot-mtk.bin
vendor=mediatek
wr_ctp=filesize_check 0xF20000;if test ${filesize_result} = good; then nand erase.spread 0x1C0000 0xF20000 ;nand write ${loadaddr} 0x1C0000 0xF20000;fi
wr_cumstom_image=custom_image_check 0x8000000;if test ${img_result} = good; then nand erase.chip ;nand write 0x40000000 0x0 0x1800000;fi
wr_flashimage=filesize_check 0x8000000;if test ${filesize_result} = good; then nand erase.chip ;nand write ${loadaddr} 0x0 ${filesize};fi
wr_uboot=filesize_check 0x100000;if test ${filesize_result} = good; then mtk_image_blks 131072;nand erase.spread 0x00000  ${filesize} ;mtk_image_blks 2048;nand write ${loadaddr} 0x00000 ${filesize};fi
write_image2=filesize_check 0x2800000;if test ${filesize_result} = good; then image_blks 131072;nand erase.spread 0x29c0000  ${filesize};image_blks 2048;nand write ${loadaddr} 0x29c0000 ${filesize};fi

Environment size: 3256/4092 bytes
And the flash map too, but unfortunately mtdparts variable wasn’t set, so u-boot isn’t aware of the mtd partition. In fact, the default bootmenu option 2 boot2 calls function boot_rd_img to load the kernel using nand command at fix offset 0x1C0000 into memory, and boot from there. We could still get the flash layout which shows up linux boot log that I have captured in the last boot, along with some extra info on flash chip as well.
[    0.826048] Recognize NAND: ID [
[    0.829109] c2 12
[    0.831128] ], [MX35LF1GE4AB], Page[2048]B, Spare [64]B Total [128]MB
[    0.837952] nand: device found, Manufacturer ID: 0xc2, Chip ID: 0x12
[    0.844321] nand: Macronix SNAND 128MiB 3,3V 8-bit
[    0.849115] nand: 128 MiB, SLC, erase size: 128 KiB, page size: 2048, OOB size: 64
[    0.856701] [NAND]select ecc bit:4, sparesize :64
[    0.861452] 9 ofpart partitions found on MTD device MTK-SNAND
[    0.867214] Creating 9 MTD partitions on "MTK-SNAND":
[    0.872274] 0x000000000000-0x000000100000 : "Bootloader"
[    0.889418] 0x000000100000-0x000000140000 : "Config"
[    0.905443] 0x000000140000-0x0000001c0000 : "Factory"
[    0.921888] 0x0000001c0000-0x0000029c0000 : "Kernel"
[    0.982719] 0x0000029c0000-0x0000051c0000 : "Kernel2"
[    1.051943] 0x0000029c0000-0x000002b80000 : "kernel"
[    1.069425] 0x000002b80000-0x0000051c0000 : "rootfs"
[    1.118419] mtd: device 6 (rootfs) set to be root filesystem
[    1.157006] 1 squashfs-split partitions found on MTD device rootfs
[    1.163200] 0x0000048c0000-0x0000051c0000 : "rootfs_data"
[    1.197789] 0x0000051c0000-0x000005200000 : "devinfo"
[    1.204161] 0x000005200000-0x000005300000 : "sysdiag"
[    1.211096] 0x000005300000-0x000007300000 : "syscfg"
[    1.252927] 0x000007300000-0x000007340000 : "s_env"
Dump the stock firmware
Now that we’ve seen how u-boot ask for the kernel from flash using nand command, let’s ask u-boot to give it the entire flash content including the spare area.
MT7629> help nand
nand - NAND sub-system

Usage:
nand info - show available NAND devices
nand device [dev] - show or set current device
nand read - addr off|partition size
nand write - addr off|partition size
    read/write 'size' bytes starting at offset 'off'
    to/from memory address 'addr', skipping bad blocks.
nand read.raw - addr off|partition [count]
nand write.raw - addr off|partition [count]
    Use read.raw/write.raw to avoid ECC and access the flash as-is.
nand erase[.spread] [clean] off size - erase 'size' bytes from offset 'off'
    With '.spread', erase enough for given file size, otherwise,
    'size' includes skipped bad blocks.
nand erase.part [clean] partition - erase entire mtd partition'
nand erase.chip [clean] - erase entire chip'
nand bad - show bad blocks
nand dump[.oob] off - dump page
nand scrub [-y] off size | scrub.part partition | scrub.chip
    really clean NAND erasing bad blocks (UNSAFE)
nand markbad off [...] - mark bad block(s) at offset (UNSAFE)
nand biterr off - make a bit error at offset (UNSAFE)
It looks like could you nand dump <start address in hex> to dump a single page (2048-byte main + 64-byte spare) starting at that address
MT7629> nand dump 0
Address 0 dump (2048):
42 4f 4f 54 4c 4f 41 44 45 52 21 00 56 30 30 36 4e 46 49 49 4e 46 4f 00 00 00 00 08 05 00 40 00
40 00 00 08 10 00 16 00 00 00 00 00 00 00 00 00 00 00 00 00 00 00 00 00 00 00 00 00 00 00 00 00
00 00 00 00 00 00 00 00 00 00 00 00 00 00 00 00 00 00 00 00 00 00 00 00 00 00 00 00 00 00 00 00
00 00 00 00 b1 11 39 64 db 22 23 de c5 24 e5 fe 2c 7f ba d0 2a ba e5 b2 2e 08 01 41 f1 24 00 00

ff ff ff ff ff ff ff ff ff ff ff ff ff ff ff ff ff ff ff ff ff ff ff ff ff ff ff ff ff ff ff ff
ff ff ff ff ff ff ff ff ff ff ff ff ff ff ff ff ff ff ff ff ff ff ff ff ff ff ff ff ff ff ff ff
ff ff ff ff ff ff ff ff ff ff ff ff ff ff ff ff ff ff ff ff ff ff ff ff ff ff ff ff ff ff ff ff
ff ff ff ff ff ff ff ff ff ff ff ff ff ff ff ff ff ff ff ff ff ff ff ff ff ff ff ff ff ff ff ff
ff ff ff ff ff ff ff ff ff ff ff ff ff ff ff ff ff ff ff ff ff ff ff ff ff ff ff ff ff ff ff ff
ff ff ff ff ff ff ff ff ff ff ff ff ff ff ff ff ff ff ff ff ff ff ff ff ff ff ff ff ff ff ff ff
ff ff ff ff ff ff ff ff ff ff ff ff ff ff ff ff ff ff ff ff ff ff ff ff ff ff ff ff ff ff ff ff
ff ff ff ff ff ff ff ff ff ff ff ff ff ff ff ff ff ff ff ff ff ff ff ff ff ff ff ff ff ff ff ff
ff ff ff ff ff ff ff ff ff ff ff ff ff ff ff ff ff ff ff ff ff ff ff ff ff ff ff ff ff ff ff ff
ff ff ff ff ff ff ff ff ff ff ff ff ff ff ff ff ff ff ff ff ff ff ff ff ff ff ff ff ff ff ff ff
ff ff ff ff ff ff ff ff ff ff ff ff ff ff ff ff ff ff ff ff ff ff ff ff ff ff ff ff ff ff ff ff
ff ff ff ff ff ff ff ff ff ff ff ff ff ff ff ff ff ff ff ff ff ff ff ff ff ff ff ff ff ff ff ff
ff ff ff ff ff ff ff ff ff ff ff ff ff ff ff ff ff ff ff ff ff ff ff ff ff ff ff ff ff ff ff ff
ff ff ff ff ff ff ff ff ff ff ff ff ff ff ff ff ff ff ff ff ff ff ff ff ff ff ff ff ff ff ff ff
ff ff ff ff ff ff ff ff ff ff ff ff ff ff ff ff ff ff ff ff ff ff ff ff ff ff ff ff ff ff ff ff
ff ff ff ff ff ff ff ff ff ff ff ff ff ff ff ff ff ff ff ff ff ff ff ff ff ff ff ff ff ff ff ff

ff ff ff ff ff ff ff ff ff ff ff ff ff ff ff ff ff ff ff ff ff ff ff ff ff ff ff ff ff ff ff ff
ff ff ff ff ff ff ff ff ff ff ff ff ff ff ff ff ff ff ff ff ff ff ff ff ff ff ff ff ff ff ff ff
ff ff ff ff ff ff ff ff ff ff ff ff ff ff ff ff ff ff ff ff ff ff ff ff ff ff ff ff ff ff ff ff
ff ff ff ff ff ff ff ff ff ff ff ff ff ff ff ff ff ff ff ff ff ff ff ff ff ff ff ff ff ff ff ff
ff ff ff ff ff ff ff ff ff ff ff ff ff ff ff ff ff ff ff ff ff ff ff ff ff ff ff ff ff ff ff ff
ff ff ff ff ff ff ff ff ff ff ff ff ff ff ff ff ff ff ff ff ff ff ff ff ff ff ff ff ff ff ff ff
ff ff ff ff ff ff ff ff ff ff ff ff ff ff ff ff ff ff ff ff ff ff ff ff ff ff ff ff ff ff ff ff
ff ff ff ff ff ff ff ff ff ff ff ff ff ff ff ff ff ff ff ff ff ff ff ff ff ff ff ff ff ff ff ff
ff ff ff ff ff ff ff ff ff ff ff ff ff ff ff ff ff ff ff ff ff ff ff ff ff ff ff ff ff ff ff ff
ff ff ff ff ff ff ff ff ff ff ff ff ff ff ff ff ff ff ff ff ff ff ff ff ff ff ff ff ff ff ff ff
ff ff ff ff ff ff ff ff ff ff ff ff ff ff ff ff ff ff ff ff ff ff ff ff ff ff ff ff ff ff ff ff
ff ff ff ff ff ff ff ff ff ff ff ff ff ff ff ff ff ff ff ff ff ff ff ff ff ff ff ff ff ff ff ff
ff ff ff ff ff ff ff ff ff ff ff ff ff ff ff ff ff ff ff ff ff ff ff ff ff ff ff ff ff ff ff ff
ff ff ff ff ff ff ff ff ff ff ff ff ff ff ff ff ff ff ff ff ff ff ff ff ff ff ff ff ff ff ff ff
ff ff ff ff ff ff ff ff ff ff ff ff ff ff ff ff ff ff ff ff ff ff ff ff ff ff ff ff ff ff ff ff
ff ff ff ff ff ff ff ff ff ff ff ff ff ff ff ff ff ff ff ff ff ff ff ff ff ff ff ff ff ff ff ff

ff ff ff ff ff ff ff ff ff ff ff ff ff ff ff ff ff ff ff ff ff ff ff ff ff ff ff ff ff ff ff ff
ff ff ff ff ff ff ff ff ff ff ff ff ff ff ff ff ff ff ff ff ff ff ff ff ff ff ff ff ff ff ff ff
ff ff ff ff ff ff ff ff ff ff ff ff ff ff ff ff ff ff ff ff ff ff ff ff ff ff ff ff ff ff ff ff
ff ff ff ff ff ff ff ff ff ff ff ff ff ff ff ff ff ff ff ff ff ff ff ff ff ff ff ff ff ff ff ff
ff ff ff ff ff ff ff ff ff ff ff ff ff ff ff ff ff ff ff ff ff ff ff ff ff ff ff ff ff ff ff ff
ff ff ff ff ff ff ff ff ff ff ff ff ff ff ff ff ff ff ff ff ff ff ff ff ff ff ff ff ff ff ff ff
ff ff ff ff ff ff ff ff ff ff ff ff ff ff ff ff ff ff ff ff ff ff ff ff ff ff ff ff ff ff ff ff
ff ff ff ff ff ff ff ff ff ff ff ff ff ff ff ff ff ff ff ff ff ff ff ff ff ff ff ff ff ff ff ff
ff ff ff ff ff ff ff ff ff ff ff ff ff ff ff ff ff ff ff ff ff ff ff ff ff ff ff ff ff ff ff ff
ff ff ff ff ff ff ff ff ff ff ff ff ff ff ff ff ff ff ff ff ff ff ff ff ff ff ff ff ff ff ff ff
ff ff ff ff ff ff ff ff ff ff ff ff ff ff ff ff ff ff ff ff ff ff ff ff ff ff ff ff ff ff ff ff
ff ff ff ff ff ff ff ff ff ff ff ff ff ff ff ff ff ff ff ff ff ff ff ff ff ff ff ff ff ff ff ff
ff ff ff ff ff ff ff ff ff ff ff ff ff ff ff ff ff ff ff ff ff ff ff ff ff ff ff ff ff ff ff ff
ff ff ff ff ff ff ff ff ff ff ff ff ff ff ff ff ff ff ff ff ff ff ff ff ff ff ff ff ff ff ff ff
ff ff ff ff ff ff ff ff ff ff ff ff ff ff ff ff ff ff ff ff ff ff ff ff ff ff ff ff ff ff ff ff
ff ff ff ff ff ff ff ff ff ff ff ff ff ff ff ff ff ff ff ff ff ff ff ff ff ff ff ff ff ff ff ff

OOB (64):
ff ff ff ff ff ff ff ff ff ff ff ff ff ff ff ff ff ff ff ff ff ff ff ff ff ff ff ff ff ff ff ff
ff ff ff ff ff ff ff ff ff ff ff ff ff ff ff ff ff ff ff ff ff ff ff ff 00 00 00 00 00 00 00 00
To automate this, I prepare a python script to ask u-boot for one page at a time and save the result into a dump-<hex address>.bin file, and the reason for including the starting address is because it will take a long time (1.6s for each page) and my uart adapter may give up at some point, thus i have to concatenate multiple .bin files to get the entire flash.
import serial
import time
import os,sys

# take 128*1024^2/(2048+64)*1.6/3600/24 = 4.5 days to dump the chip

MAIN_START = b'dump (2048):'
OOB_START = b'OOB (64):'
OOB_LEN = 196
SPACE_CHARS = b"\x20\x0A\x09\x0D" # space \n \t \r

BLOCK_SIZE = 2048  # Adjust to match the NAND dump size per block
BUFFER_SIZE = 6500

def clean(data):
    return bytes(b for b in data if b not in SPACE_CHARS)

def convert(data):
    # binary = bytes.fromhex(data.decode())
    try:
        binary = bytes.fromhex(data.decode())
    except ValueError as e:
        print(data)
        print(f"Error: {e}")
    return binary

def parse(data):
    s1 = data.find(MAIN_START)
    s2 = data.find(OOB_START)
    s3 = s2+len(OOB_START)+OOB_LEN
    if s1 == -1 or s2 == -1 or s3 == -1:
        print('Snippet not found ',s1,s2,s3)
        sys.exit(1)
    main = convert(clean(data[s1+len(MAIN_START):s2]))
    oob = convert(clean(data[s2+len(OOB_START):s3]))
    return main, oob


def main():
    serial_path = sys.argv[1]
    baud_rate = 115200  # Set the baud rate (adjust if needed)

    # Open the serial device
    try:
        ser = serial.Serial(serial_path, baudrate=baud_rate, timeout=1)
        print(f"Opened serial device {serial_path} at {baud_rate} baud.")
    except Exception as e:
        print(f"Failed to open serial device: {e}")
        return

    if len(sys.argv) > 2:
        address = int(sys.argv[2],16)
    else:
        address = 0
    # Open a binary file to save the output
    output_file = f"dump-{hex(address)}.bin"
    try:
        with open(output_file, "wb") as f:

            while True:
                # if address > 4096:
                #     break
                # Build and send the `nand dump` command
                command = f"nand dump {hex(address)}\n"
                print(f"Sending command: {command.strip()}")
                ser.write(command.encode())
                start_time = time.perf_counter()
                time.sleep(0.5)  # Wait for the device to process the command
                # Read the output from the serial device
                data = ser.read(BUFFER_SIZE)

                if not data:
                    print("No more data received. Exiting.")
                    break
                elif len(data) < 50:
                    print(str(data))
                    break
                main,oob = parse(data)
                # Save the received data to the binary file
                f.write(main+oob)
                runtime = time.perf_counter() - start_time
                print(f"Saved {len(data)} bytes from address {address} in {runtime:.4f} seconds.")

                # Increment the address for the next block
                address += BLOCK_SIZE

        print(f"NAND dump saved to {output_file}.")
    except Exception as e:
        print(f"Error during file writing: {e}")
    finally:
        ser.close()
        print("Serial device closed.")

if __name__ == "__main__":
    main()
I did messed it up the first time
The other way to dump the flash I didn’t want to mention is to lift the flash chip (located on the back) off the pcb and use a chip programmer to read the it, you’ll get the entire flash content in less in 2 minutes (at least on my XGecu T48). In fact, I attempted this on the first victim, the EA7500v3 and no matter how much heat I gave it, I couldn’t make it budge but ended up lifting it off in pieces (yes skill issue isn’t it). The failure haunted me since, but I would still try it for the secret sauce on things I would never use again. Which comes to the second problem, it’s not that I’m afraid of lifting up chips, it’s just those leadless one (like WSON-8 which have no ‘legs’) because putting them back on the board feels impossible, and I have accompished 0 so far. This feels like a bit of a rant too.
Recover
With the chip showing off its shiny silicon, the idea of running debian on this ARM chip goes down the drain. However, by coincident early this year, I found another ad about this EA7250 which has no entry in OpenWRT device list or any other device wiki sites at the time, so I went straight to Linksys support website for this model and got myself a copy of the firmware. Thankfully there is encryption as expected, I was able to disect it with binwalk and got my hand on the lovely linux dts file
/dts-v1/;

/ {
	timestamp = <0x621974e5>;
	description = "ARM OpenWrt FIT (Flattened Image Tree)";
	#address-cells = <0x01>;

	images {

		kernel@1 {
			description = "ARM OpenWrt Linux-4.4.146";
			data = <some binary>;
			type = "kernel";
			arch = "arm";
			os = "linux";
			compression = "lzma";
			load = <0x40008000>;
			entry = <0x40008000>;

			hash@1 {
				value = <0x1587a0f5>;
				algo = "crc32";
			};

			hash@2 {
				value = <0xdf353030 0x8a23dbe4 0x60b460f4 0xe5212e84 0x72785209>;
				algo = "sha1";
			};
		};

		fdt@1 {
			description = "ARM OpenWrt MT7629-LYNX-RFB3 device tree blob";
			data = [some more binary];
			type = "flat_dt";
			arch = "arm";
			compression = "none";

			hash@1 {
				value = <0x5ea132d0>;
				algo = "crc32";
			};

			hash@2 {
				value = <0x83209e24 0xc92bef00 0x56e693f8 0x276b2df7 0xa00e5266>;
				algo = "sha1";
			};
		};
	};

	configurations {
		default = "config@1";

		config@1 {
			description = "OpenWrt";
			kernel = "kernel@1";
			fdt = "fdt@1";
		};
	};
};
We could dig deeper for the full tree with all the hardware by decoding the binary (which I leave out) in fdt@1, but knowing just the cpu is good enough. With that detail and seller’s pictures, this one feels like ‘old wine in new bottles’ (I just looked up this one, do people actually use it), then later that day I snagged it without second thought because the price couldn’t be any better, and the seller was really nice too.
Update: I look it up again and this device.report shows that there are other models under the same hardware out there
To sumarize, this is the one that I first got the full flash content from using that python script above. We’ll set that aside for a letter day.
Set up a test network
From the boot menu, it’s obvious that this device and in fact, almost all of these cheap wifi router support booting from network which will comes in handy when I need to experiment with our own software. The reason we need to get our custom build stuff to run on this is because we always got hit with a login prompt in stock linux after the device fully booted which is as expected and the stock u-boot doesn’t support booting anything other than flash and tftp; but come on what else did we expect for this class of devices, it’s router bro, normal people don’t do weird thing with their router.
Depends on your set up if you want to replicate this, I have the device hooked up with ethernet to same network my PC is on, so we don’t have to worry about running another dhcp server when we need one. Here is the dnsmasq config file I use to run a tftp server from my PC
port=0
no-dhcp-interface=
no-daemon
enable-tftp
tftp-root=/tftpserver
tftp-no-fail
We disable DHCP and DNS with the first 2 lines, the folder /tftpserver needs to be created with the files we’ll put in there being world-readable.
chmod o+r -R /tftpserver
Build custom u-boot
Next, We build a custom u-boot image with support for booting from usb devices
First, as a homelaber myself, I got many of the great software mirroring on a local Gitea server running in Docker just for these occasions.
git clone https://git.home.suunhuy.com/backuper/u-boot.git
git checkout v2025.04
Let’s do the build in a already prepared Docker image to save us some time with tooling
docker run -it --rm -v $PWD:/app --name my-uboot trini/u-boot-gitlab-ci-runner:noble-20250415.1-14May2025 bash
Inside the container, we need some cross compiler since my PC is x86
apt install gcc gcc-arm-linux-gnueabihf -y
export ARCH=arm CROSS_COMPILE=arm-linux-gnueabihf-
Now, switch to a user with the same UID as my PC user, usually uid=1000 to avoid compiling issues
su ubuntu # switch to user ubuntu (uid=1000)
make mt7629_rfb_defconfig
Make some changes in make menuconfig and start the compiling with make -j$(nproc), here are mine
CONFIG_USBCONFIG_CMD_BOOTDEVCONFIG_CMD_BOOTZCONFIG_CMD_LSBLKCONFIG_CMD_MTDCONFIG_CMD_PARTCONFIG_CMD_PCICONFIG_CMD_POWEROFFCONFIG_CMD_NFSCONFIG_CMD_DHCPCONFIG_CMD_DNSCONFIG_CMD_PXECONFIG_CMD_SYSBOOTCONFIG_CMD_EXT4CONFIG_CMD_SQUASHFS
Some of these may not actually show up since I only used the included
mt7629_rfb_defconfigfor the reference board when compiling.
Specifically, it is missing the device source tree which is a .dts file that tells the kernel what type of hardware located on which memory addresses. However, all we need from this custom build is usb support to use as jumping point to boot into Debian, the default defconfig is just good enough.
But then on second though, for the sake of my curiosity, let’s see if I port the dts file for this EA7500v3 over from OpenWRT over. Here a list of compiling errors I encountered and managed to compile it successfully
- copying
mt7629-linksys-ea7500-v3.dtsandmt7629.dtsiover into u-boot atarch/arm/dts, runmakeand got ‘Label or path not found’ for bch, ssusb, pio and u3phy0 - proceeded to
grepfor those this OpenWRT and found a patch that define them attarget/linux/mediatek/patches-6.6/130-dts-mt7629-add-snand-support.patch, I then copied them over into a my own file namedmt7629-mine.dtsiand included itmt7629-linksys-ea7500-v3.dts. Runningmakeagain gave ‘Duplicate label ‘u2port0’ on /t-phy@1a0c4000/usb-phy@0 and /usb-phy@1a0c4000/usb-phy@0’ - after another
grepfor ‘u2port0’, it is clear that themt7629.dtsiI copied over had already defined it under ‘u3phy’ but mymt7629-mine.dtsidefined it again under ‘u3phy0’. I then removed that ‘u3phy0’ that change all its references inmt7629-linksys-ea7500-v3.dtsto ‘u3phy’ - fixes seemed to have worked, and I use stock u-boot to load the compiled
u-boot.binover tftp, and it stopped atDRAM: initcall failedAfter carefully comparing the new dts vs dts for reference board, it found the culprit to be myself for forgeting to add an include file namedmt7629-rfb-u-boot.dtsi. Eventually I finally got it working with the new dts file and was able to control the power LED throughledcommand in my new u-boot which hadn’t been the case before. Still, I couldn’t add get nand info through this new u-boot build since addingCONFIG_CMD_NANDcausemaketo failed withboard_nand_initfunction missing fromboard/mediatek/mt7629/mt7629_rfb.c.
We copy u-boot.bin from root folder to the tftpserver folder I prepared earlier.
Build custom linux
In the same manner as building u-boot, we speed things up by using a ubuntu docker container to build the kernel from mainlain source
# pull from source
git clone https://git.home.suunhuy.com/backuper/linux.git
git checkout v6.15
# run ubuntu container
docker run -it --rm -v $PWD:/app --name my-linux ubuntu:noble bash
# inside container
apt update
apt install -y git make gcc g++ device-tree-compiler bc bison flex libssl-dev libncurses-dev python3-ply python3-git libgmp3-dev libmpc-dev
# install cross-compiler
apt install -y gcc gcc-arm-linux-gnueabihf
# switch to ubuntu user (uid=1000)
su ubuntu
git checkout 1_36_stable # 37 failed
export ARCH=arm CROSS_COMPILE=arm-linux-gnueabihf-
make multi_v7_defconfig
make menuconfig # CONFIG_NET_DSA_MT7530
make -j$(nproc)
We copy the kernel file compressed Image.gz and the device tree arch/arm/boot/dts/mediatek/mt7629-rfb.dtb from arch/arm/boot to the same tftpserver folder.
Build a FIT image
To build linux from u-boot, we need to request a kernel, a devicetree and a root filesystem over tftp and save them into memory. Here is how I do it in u-boot shell
tftp Image; tftp 0x43000000 mt7629-rfb.dtb; tftp 0x41e00000 u-boot.bin
However, could combine all of them into what they called a Flattenned Image Tree or FIT image. Writting a recipe file and run a single command is all we need to do
/dts-v1/;

/ {
    description = "My EA7250 FIT Image";
    #address-cells = <1>;

    images {
        kernel {
            description = "ARM Mainline Linux Kernel for MT7629";
            data = /incbin/("Image.gz");
            type = "kernel";
            arch = "arm";
            os = "linux";
            compression = "gzip";
	    load = <0x40008000>;
	    entry = <0x40008000>;
        };
        fdt {
            description = "mt7629-rfb DTB";
            data = /incbin/("mt7629-rfb.dtb");
            type = "flat_dt";
            arch = "arm";
            compression = "none";
        };
        initrd {
            description = "Initrd";
            data = /incbin/("initramfs.cpio.gz");
            type = "ramdisk";
            arch = "arm";
            os = "linux";
            compression = "gzip";
        };
    };

    configurations {
        default = "standard";
        standard {
            description = "Standard Boot";
            kernel = "kernel";
            fdt = "fdt";
            ramdisk = "initrd";
        };
    };
};
After running mkimage -f board.its board.itb, the combined image is ready to boot.
First linux test boot
Going back u-boot shell, I connect one of the LAN port of the device to my test network (WAN port didn’t work for me) and create a simple bootmenu option with the command chain to automate this.
setenv bootmenu_9 '10. Load board.itb from tftp and run start Linux.=run boot11'
setenv boot11 'tftp board.itb; setenv bootargs console=ttyS0,115200; bootm'
saveenv
The new option is now added and we could just select it on next boot without having to go into u-boot shell again. Since we are still here, I could run run boot11 proceed
The FIT image is recognized and loaded as expected but I encountered a kernel panic
[    3.610479] Run /init as init process
[    3.614531] Failed to execute /init (error -8)
[    3.618997] Run /sbin/init as init process
[    3.623447] Starting init: /sbin/init exists but couldn't execute it (error -8)
[    3.630774] Run /etc/init as init process
[    3.634923] Run /bin/init as init process
[    3.638984] Run /bin/sh as init process
[    3.642915] Kernel panic - not syncing: No working init found.  Try passing init= option to kernel. See Linux Documentation/admin-guide/init.rst for guidance.
[    3.657099] CPU: 0 UID: 0 PID: 1 Comm: swapper/0 Tainted: G        W           6.15.0 #3 NONE
To be continued
Create a debian image
Save debian to a usb stick
Persist u-boot onto flash
Save u-boot to some spare flash area Configure stock u-boot to run it by default
Booting it untethered
Complete debian boot without relying on tftp server
Do some benchmark
stress test and compare score to RPi4 run some game server since there is no graphic output
What to do with the flash dump
What I learnt
References
- https://docs.mono.si/tutorials/linux-from-scratch#build-the-initramfs